Test Block Top

The Blog...
Articles, Tips & Trick and Other Interesting Information...

26 Mei 2012

Tips Memilih Provider Hosting

Faktor apa saja yang harus dipertimbangkan oleh webmaster dalam memilih hosting provider? Tidak berbeda dengan seorang pebisnis online ataupun blogger veteran, kriteria hosting provider yang dapat diandalkan tidak hanya memberikan layanan (service) yang baik namun harga yang terjangkau (masuk akal/reasonable cost) patut juga dipertimbangkan.

Jika anda sekarang bingung cari hosting provider yang dapat diandalkan, tips memilih hosting provider berikut dapat anda jadikan referensi. Tentu saja anda ingin uang & waktu tidak terbuang percuma dikarenakan tidak ada kecocokan antara hosting provider dan kebutuhan situs anda.

Service & Technical Support

Pertama dan yang paling penting, lihat fasilitas support client (customer service) dan technical support yang tersedia pada masing-masing hosting provider. Standar minimal provider hosting yang bagus umumnya menyediakan fasilitas pelayanan client via email, submit ticket, telepon, sms ataupun online chat pada situs mereka.

Dimana dan kapanpun anda mengalami permasalahan, hosting provider harus mampu memberikan respon yang memuaskan dalam kurun waktu tidak lebih dari 1x24 jam. Untuk testing feedback respond, coba kirim email dengan subjek permasalahan yang umum atau coba chat dengan mereka jika fasilitas online chatting (live chat) tersedia.

Jika respon terhadap pertanyaan/permasalahan anda cepat (setidaknya 2 atau 3 kali masa coba), satu kandidat hosting provider sudah anda dapat, setidaknya untuk satu poin seleksi ini.

Exist

Poin kedua yang harus anda ketahui adalah sudah berapa lama hosting provider berkecimpung dalam dunia hosting. Gunakan WHOIS checker untuk menelusuri tanggal dibuatnya nama domain hosting provider terkait. Cek whois di sini.

Hosting provider yang sudah berkecimpung dalam bisnis hosting setidaknya minimal satu tahun patut anda pertimbangkan.

Traffic Bandwidth Allowed

Cari tahu batasan jumlah bandwidth (data transfer) yang ditawarkan hosting provider. Jika situs/website anda melebihi batas pemakaian bandwidth per bulan, visitor/pengunjung situs tidak akan bisa mengakses website anda.

Pastikan (perkirakan) jumlah batasan maksimum bandwidth per bulan cukup memadai untuk memenuhi kebutuhan traffic situs/website anda.

Maksimum Disk Space

Masih dalam subjek masalah yang sama, cari tahu batasan data penyimpanan (disk space) file maksimum yang ditawarkan provider hosting. Kapasitas penyimpanan yang besar berarti memberikan keleluasaan kepada anda untuk membuat situs/website dengan ukuran file yang cukup besar (website yang kompleks).

Garansi 100% Uang Kembali (money back guarantee)

Cari tahu apakah hosting provider memberikan garansi uang kembali. Untuk berjaga-jaga & menekan (me-minimalisir) biaya jika sewaktu-waktu anda tidak puas dengan layanan/fitur hosting dan ingin membatalkan kontrak memakai jasa hosting mereka.

Cek jaminan garansi uang kembali yang ditawarkan hosting provider setidaknya minimal 7 hari.

Good Uptime

Poin lainnya yang perlu digaris bawahi adalah apakah hosting provider memberikan jaminan uptime server yang bagus. Jika uptime kurang bagus, imbasnya situs anda akan sering down dari waktu ke waktu. Jangan sampai anda kehilangan customer, visitor atau subscriber dikarenakan server web sering down.

Jika semua poin di atas terpenuhi, dapat dipastikan 95% anda sudah menemukan kandidat provider hosting yang dapat diandalkan.

Tips:

Jangan terpancing dengan tawaran bandwidth (data transfer) & disk space yang gila-gilaan (ratusan GB / Unlimited) dengan harga super murah. Kenapa? Alasannya simpel; harga penambahan slot bandwidth & disk space yang ditawarkan data center tidaklah murah, dan juga bandwidth atau disk space selalu punya batasan (nonsense jika unlimited). Lebih reasonable (masuk akal) jika hosting provider menawarkan unmetered (bukan unlimited) bandwidth & disk space, namun tentu saja dengan harga yang sebanding (mahal).

Good luck & Have fun...
:D
22 Mei 2012

Caesium Image Compressor

Compress (memperkecil) ukuran file gambar (image) kadang diperlukan dengan bermacam alasan. Salah satu contohnya webmaster sering compress gambar kreasi mereka sebelum diupload ke webserver, alasannya sederhana; untuk menghemat traffic bandwidth, ruang penyimpanan (disk space) dan memperkecil (mempercepat) waktu loading web. Terlebih lagi bagi webmaster photo blog, biasanya mereka posting file photo hasil jepretan minimal Kamera Digital SLR yang mempunyai resolusi diatas 3000 pixels. Untuk kualitas gambar di atas 3000 pixels tentu saja konsekuensinya file size image minimal 1 MB atau bahkan jauh di atasnya. Dan juga bagi pengguna PC rumah yang mempunyai koleksi photo kamera digital misalnya, sudah pasti file-file ini akan banyak memakan resource ruang penyimpanan (hard disk). Untuk beberapa alasan inilah mengapa compress image diperlukan.

Anda dapat compress file gambar menggunakan bermacam software image compressor yang tersedia, baik itu software lisensi berbayar (paid license) ataupun yang gratis (GNU General Public License). Namun pada artikel kali ini saya akan sedikit mengulas cara compress (memperkecil) file gambar menggunakan software open source (gratis) image compression Caesium. Caesium merupakan salah satu powerfull tool image compression gratis yang dapat memperkecil ukuran size file gambar rata-rata sampai 80% tanpa mengurangi kualitas ketajaman gambar (tentu saja jika dilihat sekilas).

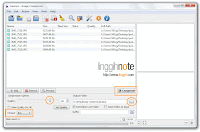
Langsung saja!! Untuk mulai download terlebih dahulu Caesium, setelah itu install di komputer anda & buka aplikasi. Import file gambar dengan klik pada icon Add Pictures atau import beberapa file gambar sekaligus dalam satu folder dengan klik pada icon Add Folder (Screenshot 1). Anda dapat juga drag & drop file gambar ke jendela aplikasi Ceasium, supported file extention Caesium diantaranya JPEG (JPG), PNG & BMP.

Pada artikel ini saya akan coba compress 6 image file photo, masing-masing file mempunyai file size di atas 5 MB dan mempunyai dimensi gambar 5184 x 3456 pixels (Screenshot 2 & Screenshot 3).

Image Compressor Caesium 1

Screenshot 1

Image Compressor Caesium 2

Screenshot 2

Image Compressor Caesium 3

Screenshot 3

Setelah file gambar selesai di import, sesuaikan kualitas output, format output (JPG, PNG atau BMP) & output folder kemudian klik tombol Compress! (Screenshot 4). Setelah proses compress image selesai, anda dapat melihat file size baru & rasio compression. Dapat anda lihat pada Screenshot 5, rata-rata rasio penurunan file size 80% dari 5 MB ditekan ke kisaran 1 MB.

Hasil perbandingan gambar (image) sebelum dan sesudah di compress dapat anda lihat pada Screenshot 6 (karena ukuran gambar terlalu besar, saya potong sebagian / dimensi 1024 x 360 pixel).

Image Compressor Caesium 4

Screenshot 4

Image Compressor Caesium 5

Screenshot 5

Image Compressor Caesium 6

Screenshot 6

File gambar (image) hasil compress software gratis ini sulit dibedakan dibanding file aslinya (uncompressed) jika dilihat dengan mata telanjang. Namun tentu saja ada perbedaan jika dianalisa lebih lanjut, silahkan coba sendiri jika anda penarasan. Download Caesium di sini.

Semoga bermanfaat...
:)
17 Mei 2012

RAR & Unrar CentOS Linux

Untuk extract atau buat archive RAR, jika anda pakai sistem operasi windows bisa dilakukan dengan terlebih dahulu install executable file (.exe) software RAR seperti WinRAR atau 7zip misalnya. Namun tidak demikian halnya dengan CentOS Linux, instalasi RAR & UNRAR dilakukan dengan mengetikkan command pada jendela terminal (bash).

Command: yum install rar & yum install unrar.


[root@linggih ~]# yum install rar
Loaded plugins: fastestmirror
Loading mirror speeds from cached hostfile
epel/metalink                                            | 4.1 kB     00:00
* base: centos.biz.net.id
* epel: epel.idrepo.or.id
* extras: centos.biz.net.id
* remi: rpms.famillecollet.com
* updates: centos.idrepo.or.id
base                                                     | 3.7 kB     00:00
extras                                                   | 3.5 kB     00:00
remi                                                     | 2.9 kB     00:00
updates                                                  | 3.5 kB     00:00
Setting up Install Process
No package rar available.
Error: Nothing to do
[root@linggih ~]#

Seperti yang terlihat di atas, RAR & UNRAR tidak tersedia pada yum repositories default CentOS Linux. Untuk install RAR & UNRAR via yum, rpmforge repo terlebih dahulu harus terinstall.

Install rpmforge Repo

Pertama, cek arsitektur CentOS (32-Bit atau 64-Bit). Cek command; uname -a atau uname -i

32-Bit CentOS Linux (i386)


[root@localhost ~]# uname -a
Linux localhost.localdomain 2.6.18-308.4.1.el5 #1 SMP Tue Apr 17 17:08:10 EDT 2012 i686 athlon i386 GNU/Linux
[root@localhost ~]# uname -i
i386
[root@localhost ~]#

64-Bit CentOS Linux (x86_64)


[root@linggih ~]# uname -a
Linux linggih.sytes.net 2.6.32-220.13.1.el6.x86_64 #1 SMP Tue Apr 17 23:56:34 BST 2012 x86_64 x86_64 x86_64 GNU/Linux
[root@linggih ~]# uname -i
x86_64
[root@linggih ~]#

Install rpmforge 32-Bit System


[root@localhost ~]# rpm -Uhv http://apt.sw.be/redhat/el5/en/i386/rpmforge/RPMS/rpmforge-release-0.3.6-1.el5.rf.i386.rpm
Retrieving http://apt.sw.be/redhat/el5/en/i386/rpmforge/RPMS/rpmforge-release-0.3.6-1.el5.rf.i386.rpm
warning: /var/tmp/rpm-xfer.j1iAgn: Header V3 DSA signature: NOKEY, key ID 6b8d79e6
Preparing...                ########################################### [100%]
1:rpmforge-release       ########################################### [100%]
[root@localhost ~]#

Install rpmforge 64-Bit System


[root@linggih ~]# rpm -Uhv http://packages.sw.be/rpmforge-release/rpmforge-release-0.5.2-2.el5.rf.x86_64.rpm
Retrieving http://packages.sw.be/rpmforge-release/rpmforge-release-0.5.2-2.el5.rf.x86_64.rpm
warning: /var/tmp/rpm-tmp.KfyCjc: Header V3 DSA/SHA1 Signature, key ID 6b8d79e6: NOKEY
Preparing...                ########################################### [100%]
1:rpmforge-release       ########################################### [100%]
[root@linggih ~]#

Command di atas akan install file rpmforge.repo pada direktori /etc/yum.repos.d dan rpm-gpg key pada direktori /etc/pki. Untuk disable rpmforge repo, edit rpmforge.repo pada direktori /etc/yum.repos.d dan set value enabled ke 0.

Install RAR

Setelah rpmforge repo terinstall, sekarang RAR dapat diinstall via yum.

Command install: yum install rar


[root@linggih ~]# yum install rar
Loaded plugins: fastestmirror
Loading mirror speeds from cached hostfile
* base: centos.biz.net.id
* epel: sulawesi.idrepo.or.id
* extras: centos.biz.net.id
* remi: remirpm.mirror.gymkl.ch
* rpmforge: mirror.oscc.org.my
* updates: centos.idrepo.or.id
rpmforge                                                 | 1.1 kB     00:00
rpmforge/primary                                         | 4.0 MB     00:18
rpmforge                                                            11165/11165
Setting up Install Process
Resolving Dependencies
--> Running transaction check
---> Package rar.x86_64 0:3.8.0-1.el5.rf will be installed
--> Finished Dependency Resolution

Dependencies Resolved

================================================================================
Package      Arch            Version                   Repository         Size
================================================================================
Installing:
rar          x86_64          3.8.0-1.el5.rf            rpmforge          265 k

Transaction Summary
================================================================================
Install       1 Package(s)

Total download size: 265 k
Installed size: 546 k
Is this ok [y/N]: y
Downloading Packages:
rar-3.8.0-1.el5.rf.x86_64.rpm                            | 265 kB     00:01
Running rpm_check_debug
Running Transaction Test
Transaction Test Succeeded
Running Transaction
Warning: RPMDB altered outside of yum.
Installing : rar-3.8.0-1.el5.rf.x86_64                                    1/1

Installed:
rar.x86_64 0:3.8.0-1.el5.rf

Complete!
[root@linggih ~]#

Install UNRAR


Command Install: yum install unrar


[root@linggih ~]# yum install unrar
Loaded plugins: fastestmirror
Loading mirror speeds from cached hostfile
* base: centos.biz.net.id
* epel: mirror.nus.edu.sg
* extras: centos.biz.net.id
* remi: remirpm.mirror.gymkl.ch
* rpmforge: mirror.oscc.org.my
* updates: centos.idrepo.or.id
Setting up Install Process
Resolving Dependencies
--> Running transaction check
---> Package unrar.x86_64 0:4.1.4-1.el5.rf will be installed
--> Finished Dependency Resolution

Dependencies Resolved

================================================================================
Package        Arch            Version                 Repository         Size
================================================================================
Installing:
unrar          x86_64          4.1.4-1.el5.rf          rpmforge          115 k

Transaction Summary
================================================================================
Install       1 Package(s)

Total download size: 115 k
Installed size: 233 k
Is this ok [y/N]: y
Downloading Packages:
unrar-4.1.4-1.el5.rf.x86_64.rpm                          | 115 kB     00:00
Running rpm_check_debug
Running Transaction Test
Transaction Test Succeeded
Running Transaction
Installing : unrar-4.1.4-1.el5.rf.x86_64                                  1/1

Installed:
unrar.x86_64 0:4.1.4-1.el5.rf

Complete!
[root@linggih ~]#

Contoh Penggunaan Command RAR & UNRAR

UNRAR

command: unrar x namafile.rar

Contoh:


[root@localhost plugins]# unrar x SyntaxHighlighter_1.5.1.rar

UNRAR 4.10 freeware      Copyright (c) 1993-2012 Alexander Roshal


Extracting from SyntaxHighlighter_1.5.1.rar

Creating    dp.SyntaxHighlighter                                      OK
Creating    dp.SyntaxHighlighter/Scripts                              OK
Extracting  dp.SyntaxHighlighter/Scripts/clipboard.swf                OK
Extracting  dp.SyntaxHighlighter/Scripts/shBrushCpp.js                OK
Extracting  dp.SyntaxHighlighter/Scripts/shBrushCSharp.js             OK
Extracting  dp.SyntaxHighlighter/Scripts/shBrushCss.js                OK
Extracting  dp.SyntaxHighlighter/Scripts/shBrushDelphi.js             OK
Extracting  dp.SyntaxHighlighter/Scripts/shBrushJava.js               OK
Extracting  dp.SyntaxHighlighter/Scripts/shBrushJScript.js            OK
Extracting  dp.SyntaxHighlighter/Scripts/shBrushPhp.js                OK
Extracting  dp.SyntaxHighlighter/Scripts/shBrushPython.js             OK
Extracting  dp.SyntaxHighlighter/Scripts/shBrushRuby.js               OK
Extracting  dp.SyntaxHighlighter/Scripts/shBrushSql.js                OK
Extracting  dp.SyntaxHighlighter/Scripts/shBrushVb.js                 OK
Extracting  dp.SyntaxHighlighter/Scripts/shBrushXml.js                OK
Extracting  dp.SyntaxHighlighter/Scripts/shCore.js                    OK
Creating    dp.SyntaxHighlighter/Styles                               OK
Extracting  dp.SyntaxHighlighter/Styles/SyntaxHighlighter.css         OK
Creating    dp.SyntaxHighlighter/Uncompressed                         OK
Extracting  dp.SyntaxHighlighter/Uncompressed/shBrushCpp.js           OK
Extracting  dp.SyntaxHighlighter/Uncompressed/shBrushCSharp.js        OK
Extracting  dp.SyntaxHighlighter/Uncompressed/shBrushCss.js           OK
Extracting  dp.SyntaxHighlighter/Uncompressed/shBrushDelphi.js        OK
Extracting  dp.SyntaxHighlighter/Uncompressed/shBrushJava.js          OK
Extracting  dp.SyntaxHighlighter/Uncompressed/shBrushJScript.js       OK
Extracting  dp.SyntaxHighlighter/Uncompressed/shBrushPhp.js           OK
Extracting  dp.SyntaxHighlighter/Uncompressed/shBrushPython.js        OK
Extracting  dp.SyntaxHighlighter/Uncompressed/shBrushRuby.js          OK
Extracting  dp.SyntaxHighlighter/Uncompressed/shBrushSql.js           OK
Extracting  dp.SyntaxHighlighter/Uncompressed/shBrushVb.js            OK
Extracting  dp.SyntaxHighlighter/Uncompressed/shBrushXml.js           OK
Extracting  dp.SyntaxHighlighter/Uncompressed/shCore.js               OK
All OK
[root@localhost plugins]#

Buat archive RAR

Command: rar a target-rar.rar target-file


[root@localhost plugins]# rar a testing.rar testing.php

RAR 3.80   Copyright (c) 1993-2008 Alexander Roshal   16 Sep 2008
Shareware version         Type RAR -? for help

Evaluation copy. Please register.

Creating archive testing.rar

Adding    testing.php                                                 OK
Done
[root@localhost plugins]#

Buat archive split RAR

Menggunakan command RAR untuk compress dan split file menjadi beberapa bagian. Untuk file yang berukuran besar (tergantung spesifikasi mesin komputer), anda harus tunggu beberapa saat sampai proses split & compress selesai.

Contoh: Ukuran file kurang lebih 122 MB MySQL dump, target size per split 20 MB, hasil split 5 file berukuran 20 MB & 1 file berukuran 18 MB.

Command: rar a -v?????k target-rar.rar target-file


[root@localhost ~]# rar a -v20480k kompres-sql.rar gede_database.sql

RAR 3.80   Copyright (c) 1993-2008 Alexander Roshal   16 Sep 2008
Shareware version         Type RAR -? for help

Evaluation copy. Please register.

Creating archive kompres-sql.rar

Adding    gede_database.sql
Calculating the control sum

Creating archive kompres-sql.part2.rar

...       gede_database.sql
Calculating the control sum

Creating archive kompres-sql.part3.rar

...       gede_database.sql
Calculating the control sum

Creating archive kompres-sql.part4.rar

...       gede_database.sql
Calculating the control sum

Creating archive kompres-sql.part5.rar

...       gede_database.sql
Calculating the control sum

Creating archive kompres-sql.part6.rar

...       gede_database.sql                                           OK
Calculating the control sum
Done
You have new mail in /var/spool/mail/root
[root@localhost ~]#

Split RAR Linux

Split RAR Linux

Extract Multiple Split File RAR

untuk extract multiple split file RAR ketikkan command:

unrar x namafile.part1.rar


[root@localhost ~]# unrar x kompres-sql.part1.rar

UNRAR 4.10 freeware      Copyright (c) 1993-2012 Alexander Roshal


Extracting from kompres-sql.part1.rar

Extracting  gede_database.sql                                         17%

Extracting from kompres-sql.part2.rar

...         gede_database.sql                                         34%

Extracting from kompres-sql.part3.rar

...         gede_database.sql                                         51%

Extracting from kompres-sql.part4.rar

...         gede_database.sql                                         68%

Extracting from kompres-sql.part5.rar

...         gede_database.sql                                         85%

Extracting from kompres-sql.part6.rar

...         gede_database.sql                                         OK
All OK
[root@localhost ~]#

UNRAR Split RAR Linux

UNRAR Split RAR Linux

Encript & Decrypt File JavaScript

Beberapa web developer sengaja compress file js (javascript), dengan alasan paling umum menghindari orang lain mencuri code yang mereka tulis. Untuk encrypt file js, online tool yang biasa digunakan web developer adalah packer buatan Dean Edwards. Tinggal paste konten file js pada text area Paste:, check checkbox Base62 encode kemudian klik tombol Pack. Hasil encrypt dapat anda lihat pada text area Copy:

Contoh hasil encrypt javascript:


eval(function(p,a,c,k,e,r){e=function(c){return c.toString(a)};if(!''.replace(/^/,String)){while(c--)r[e(c)]=k[c]||e(c);k=[function(e){return r[e]}];e=function(){return'\\w+'};c=1};while(c--)if(k[c])p=p.replace(new RegExp('\\b'+e(c)+'\\b','g'),k[c]);return p}('<1>2 3(){6.0=2(0,4){7.8(0+\' \'+4)}}5=9 3;5.0(\'a\',\'b\');</1>',12,12,'foo|script|function|HelloWorld|bar|H|this|document|write|new|Hello|World'.split('|'),0,{}))

Namun bagaimana jika anda ingin decode (decrypt) file javascript? Sayangnya packer tool Dean Edwards hanya bisa decode hasil encode text area Paste: (text area Copy: sengaja diberi batasan read-only). Sebenarnya saya maju mundur mau posting artikel ini (takut dikomplain ama Dean Edwards, ha..ha...), namun sekedar buat sharing info untuk anda yang ingin decrypt (decode) file .js hasil encript packer Dean Edwards (biasanya dimulai dengan code eval(function(p,a,c,k,e,r)..., berikut triknya.
  1. Kunjungi situs unpacker js di sini.
  2. paste code js pada text area Paste Packed Code Here
  3. Klik tombol Unpack
  4. Copy hasil encrypt (decode) file javascript pada text area Un-Packed Code
Contoh hasil decrypt code encrypt javascript di atas:


< script >
function HelloWorld() {
this.foo = function (foo, bar) {
document.write(foo + ' ' + bar)
}
}
H = new HelloWorld;
H.foo('Hello', 'World'); < /script>

Selesai
16 Mei 2012

Solved - TP-LINK Router Tidak Bisa di Reset

Hard Reset router (restore Factory Default Settings) terkadang diperlukan jika saja network admin lupa password atau perubahan setting menyebabkan client/server tidak bisa connect ke router (seperti kasus yang saya alami). Namun tentu saja hard reset sebagai alternatif akhir (final alternative) setelah alternatif lainnya gagal.

Hard reset router umumnya bisa dilakukan dengan menekan tombol reset pada panel belakang router selama beberapa detik (tergantung merk & spesifikasi router) dan setelahnya setting router akan kembali factory default settings. Namun bagaimana jika hard reset router tidak berhasil meskipun tahapan reset sudah mengikuti semua petunjuk vendor resmi router, seperti masalah yang saya alami.

Router yang saya pakai merk TP-LINK model TL-WR642g. User Guide Manual & FAQ Article website resminya sudah saya baca namun hasilnya nihil, router tidak bisa di reset ke factory default settings. Untuk hard reset router, pada user guide manual tertulis tekan & tahan tombol reset selama 5 detik kemudian lepas (hasil nihil), mungkin kurang lama. Saya coba urutkan satu persatu tekan & tahan router 5 - 40 detik, cuma dapat capek & nggak ada hasil.

Hard Reset TP-Link Router

TP-LINK User Guide

TP-LINK TL-WR642g Front

TP-LINK TL-WR642g Front

TP-LINK TL-WR642g Back

TP-LINK TL-WR642g Back

Makin penasaran jadinya, saya coba reset router saya yang lain (D-LINK Dir-600) & mengikuti petunjuk hard reset dari vendor, berhasil. Router dapat direset tanpa ada masalah. Namun tidak dengan router pabrikan TP-LINK ini, setelah beberapa kali mencoba akhirnya berhasil juga reset ini router.

D-LINK Dir600 Front

D-LINK Dir600 Front

D-LINK Dir600 Back

D-LINK Dir600 Back


Bagi anda yang mempunyai problem & merk router sama dengan saya, trik hard reset router TP-LINK berikut dapat anda terapkan:
  1. Pertama, pastikan router dalam keadaan menyala (ON)
  2. Tekan dan tahan tombol reset pada panel belakang router selama beberapa detik
  3. Matikan / cabut kabel power router dengan tetap menahan tombol reset
  4. Lepaskan tombol reset router
  5. Tekan dan tahan tombol reset
  6. Pasangkan kembali kabel power router dengan tetap menahan tombol reset
  7. Tahan tombol router selama 20 - 25 detik, kemudian lepaskan
  8. Selesai, tunggu beberapa detik sampai router selesai reset & reboot
Login ke halaman admin router dengan alamat ip default setting router (biasanya 192.168.0.1 atau 192.168.1.1), username factory default umumnya admin, password admin atau biarkan kosong (tergantung factory default setting vendor router) → baca panduan manual router.

Tips:

Selalu backup setting router setiap kali akan melakukan perubahan dan sesudah melakukan perubahan setting, sehingga anda tidak perlu setting router mulai dari awal.

Semoga bermanfaat...
:)
13 Mei 2012

Optimize MySQL (Fix Overhead Table)

Kecepatan akses load website atau blog anda menurun? Bisa jadi itu karena terlalu banyak plugin, addon, script, embed gambar yang terlalu banyak atau traffic web server sedang ramai. Namun faktor-faktor tersebut tidak selalu menjadi penyebab load situs menurun.

Database yang kurang terpelihara bisa juga menjadi penyebab load website/blog lambat. Membengkaknya ukuran file database selalu berbanding lurus dengan penambahan data pada website/blog, baik itu penambahan konten (content), plugin, komentar (comment) atau jenis penambahan data lainnya. Seiring dengan penambahan data-data ini, database menjadi terfragmentasi (konsepnya identik dengan fragment pada hard disk PC). Akibatnya koneksi request data antara browser client dengan database memakan waktu lebih lama. Ini yang menyebabkan data pada disk menjadi Overhead.

Dari uraian di atas, sederhananya begini; ibarat ratusan atau ribuan buku diperpustakaan yang tidak dikelompokkan (campur aduk), akan memakan waktu lama untuk mencari buku matematika misalnya diantara jenis buku lainnya (Fisika, Kimia, Bahasa, Sejarah, dlsb) yang amburadul/semrawut (tidak tertata). Namun akan lebih efisien jika buku-buku tersebut dikelompokkan berdasarkan jenisnya dan menyisihkan buku-buku yang sudah usang, waktu pencarian buku akan menjadi lebih cepat.

Bagi anda yang merasa akses kecepatan website/blog nya menurun, tips optimize overhead table database berikut ini bisa anda terapkan.

  1. Pertama-tama, pastikan anda sudah buat backup database & website/blog jika memungkinkan ganti ke mode maintenance atau pilih waktu optimize ketika traffic website/blog tidak terlalu ramai.
  2. Login ke halaman phpMyAdmin via cPanel atau custom directory (http://domain-anda.com/phpmyadmin misalnya) jika anda install phpMyAdmin terpisah (tidak bundle dengan cPanel) pada server VPS / dedicated server.
  3. Klik pada database yang ingin dioptimize, kemudian anda akan melihat daftar table (table paling kiri) dan overhead table (table paling kanan). Lihat screenshot di bawah.
    Optimize Overhead Table

    Optimize Overhead Table

  4. Klik pada overhead table, kemudian klik Optimize table (Screenshot lihat di bawah).
    Optimize Overhead Table 2

    Optimize Overhead Table 2

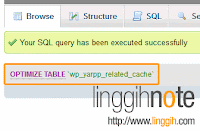
  5. Jika optimize berhasil, anda akan melihat pesan konfirmasi Optimize Table sukses.

    Success Message:

    Your SQL query has been executed successfully

    OPTIMIZE TABLE 'wp_yarpp_related_cache'

    Optimize Overhead Table 3

    Optimize Overhead Table 3

  6. Ulangi langkah ke-3 & 4 untuk optimize table lainnya sampai tidak ada lagi table overhead.
Optimize overhead table database sampai di sini selesai.

Tambahan:

Ketika user hapus item data pada interface admin maupun client area, row pada table database tidak sepenuhnya terhapus (hanya hapus data query). Identik dengan keranjang sampah (recycle bin) pada komputer PC, komputer atau server akan tetap menyaring (identifikasi) data baik itu data kosong maupun data aktual. Proses identifikasi inilah yang menentukan lama tidaknya query browser client ke database. Jika database terlalu besar imbasnya kecepatan akses load website/blog menjadi lebih lambat.

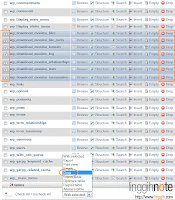
Ilustrasi pada sample artikel ini, plugin WordPress Download Monitor sudah tidak saya gunakan lagi + sudah terhapus dari daftar plugin & disk (ruang penyimpanan). Namun tidak pada table database MySQL (Lihat Screenshot di bawah). Untuk lebih mengoptimalkan database MySQL, anda dapat meminimalkan identifikasi data dengan menghapus table-table sampah yang sudah tidak terpakai. Klik pada link Drop table yang ingin dihapus satu per satu, atau klik pada checkbox sebelah kiri table untuk hapus beberapa tabel sekaligus → kemudian pada dropdown menu pilih Drop (Lihat Screenshot di bawah).
DROP Junk Table

DROP Junk Table

Pada pensan konfirmasi DROP TABLE → klik tombol Yes

Do you really want to :

DROP TABLE 'wp_download_monitor_files', 'wp_download_monitor_file_meta', 'wp_download_monitor_formats', 'wp_download_monitor_log', 'wp_download_monitor_relationships', 'wp_download_monitor_stats', 'wp_download_monitor_taxonomies';
Drop Table Confirm

Drop Table Confirm

Your SQL query has been executed successfully

DROP TABLE 'wp_download_monitor_files',
'wp_download_monitor_file_meta',
'wp_download_monitor_formats',
'wp_download_monitor_log',
'wp_download_monitor_relationships',
'wp_download_monitor_stats',
'wp_download_monitor_taxonomies';


Table Dropped

Table Dropped

Selesai.

Tips:

Lakukan pengecekan overhead table & table sampah (junk table) setidak-tidaknya satu bulan sekali untuk menghindari table crash.

Semoga bermanfaat...
:)

Sekilas Tentang Robots.txt

Dilihat dari nama ekstensi filenya .txt (text), dapat dimpulkan robots.txt merupakan file text dalam konteks artikel ini mempunyai arti file text yang dibuat khusus untuk memberitahukan robot mesin pencari (search engine) tentang apa yang harus mereka lakukan pada halaman tertentu website atau blog. Singkatnya robots.txt dikhususkan untuk membatasi aktifitas crawling search engine terhadap file ataupun direktori folder tertentu suatu website/blog.

Untuk membuat file robots.txt caranya gampang, buat file baru menggunakan text editor (notepad misalnya) dan simpan dengan nama robots.txt. Kemudian upload file ini ke direktori root website (public_html, htdocs, dlsb).

Contoh Penggunaan Syntax robots.txt

Blok Semua Robot ke Semua File/Direktori


# Blok Semua Robot ke Semua File/Direktori
User-agent: *
Disallow:

Blok Semua Robot


# Blok Semua Robot
User-agent: *
Disallow: /

Blok Semua Robot Pada Direktori/Folder Tertentu


# Blok Semua Robot Pada Direktori/Folder Tertentu
User-agent: *
Disallow: /admin/
Disallow: /member/
Disallow: /private/

Blok Spam Bots


# Blok Spam Bots
User-agent: Bad Crawler
Disallow: /

Seperti terlihat pada contoh di atas, anda bisa menyisipkan comment (komentar) pada file robots.txt untuk memudahkan identifikasi syntax. Tambahkan karakter #, kemudian tulis komentar anda.

Namun seperti layaknya karya buatan manusia lainnya, robots.txt mempunyai beberapa kelemahan, diantaranya:
  1. robots.txt tidak akan mampu blok spam bots (bad crawler/robot), biasanya spam bots mengabaikan syntax rule robots.txt.
  2. robots.txt ditujukan hanya untuk blok robot (search engine) & bukan user (site visitor).

    robots.txt merupakan public file, semua orang (site visitor) bisa melihat konfigurasi file atau direktori mana saja yang diblok oleh file robots.txt. Cukup dengan mengetikkan alamat domain atau subdomain diikuti dengan mengetikkan karakter garis miring/slash (/) + robots.txt, site visitor bisa melihat isi/konten file robots.txt (http://domain-target.com/robots.txt)

    Untuk mencegah pengunjung situs (site visitor) melihat file robots.txt, baca trik .htaccess di sini.
Tips menggunakan file robots.txt:
  1. Selalu tempatkan file robots.txt pada direktori/folder root website (baik domain utama maupun subdomain). Contoh: tempatkan pada http://domainmu.com, http://subdomain1.domainmu.com, http://subdomain2.domainmu.com, dst...
  2. Tak ada manusia yang sempurna. Tidak menutup kemungkinan penulisan code (syntax) pada file robots.txt bisa salah ketik. Gunakan tool online checker robots.txt untuk cek file robots.txt anda. Berikut beberapa situs robots.txt checker yang dapat anda kunjungi:
  3. Manfaatkan robots.txt generator pada halaman Google Webmaster Tools untuk buat file robots.txt.
  4. Untuk blok robot tertentu, info database robot bisa anda lihat pada halaman ini.
Semoga bermanfaat...
:)

Cegah Akses File robot.txt Kecuali Google

File robots.txt dikhususkan hanya untuk blok robot (search engine) & bukan user (site visitor). Karena file robots.txt merupakan public file, semua orang (site visitor) bisa melihat konfigurasi file atau direktori mana saja yang diblok oleh file robots.txt.

Cukup dengan mengetikkan alamat domain atau subdomain diikuti dengan mengetikkan karakter garis miring/slash (/) + robots.txt, site visitor bisa melihat isi/konten file robots.txt (http://domain-target.com/robots.txt) (Gambar lihat Screenshot di bawah).
Cegah Akses File robots.txt

robots.txt

Untuk menghindari visitor akses file robots.txt, berikut ada cara menyembunyikan (deny access) file robot.txt dari scanning luar kecuali untuk googlebot dan google analytics:

Buka file .htaccess, kemudian tambahkan code di bawah ini:


<Files robots.txt>
Order Deny,Allow
Deny from All
Allow from googlebot.com google.com google-analytics.com
</Files>

Simpan perubahan file .htaccess. Sekarang setiap kali ada visitor yang akses file robots.txt, akan diarahkan ke halaman error 403 (forbidden).

Forbidden

You don't have permission to access /robots.txt on this server.
Cegah Akses File robots.txt 2

robots.txt: Forbidden Error 403

Selesai. Semoga bermanfaat...
:)
11 Mei 2012

Repair 'wp_posts' Crashed Database WordPress

Beberapa saat yang lalu, kaget ketika login pada situs WordPress milik saya. Posting, page, comment, custome menu semuanya HILANG begitu saja.
WordPress Table Database Crashed wp_posts

Screenshot 1

WordPress Table Database Crashed wp_posts 3

Screenshot 2

Sempat terlintas dibenak, mungkin situsku kena hack!!! Hehe... nggak mau buru-buru ambil kesimpulan, coba cek dulu database di Webmin. Ternyata oh... ternyata..., table wp_post crashed dengan pesan error:

Error Message:

SQL show index from 'wp_posts' failed:Table './wordpress/wp_posts' is marked as crashed and should be repaired
WordPress Database Table Crashed wp_posts 1

Screenshot 3

Begitu juga pada halaman phpMyAdmin yang manampakkan pesan error serupa:

Error Message:

#145 - Table './wordpress/wp_posts' is marked as crashed and should be repaired
WordPress Database Table Crashed Error wp_posts 4

Screenshot 4

Bagi anda yang mempunyai masalah serupa dengan saya, jangan panik!! Berikut cara repair database table error (wp_posts) WordPress. Pertama login pada halaman phpMyAdmin, kemudian klik pada database WordPress anda → centang checkbox wp_posts → pada dropdown menu pilih Repair table → kemudian klik tombol Go (Screenshot lihat pada gambar di bawah).
WordPress Database Table Crashed wp_posts 5

Screenshot 5

Jika repair berhasil, anda akan menerima pesan konfirmasi sukses yang bertuliskan (Gambar; lihat pada screenshot di bawah):

Success Message:

Your SQL query has been executed successfully
REPAIR TABLE 'wp_posts'
Table 'wordpress.wp_posts', Operation 'repair', Message type 'status', Message 'OK'

WordPress Database Table Crashed wp_posts 6

Screenshot 6

Sampai di sini situs WordPress sudah kembali seperti semula (normal). Posting, page, comment, custome menu dan elemen-elemen lainnya yang hilang akan kembali muncul.

Untuk menghindari kejadian serupa pada situs WordPress anda dilain waktu, berikut ada sedikit tips yang bisa anda terapkan:
  1. Backup database WordPress secara berkala baik itu menggunakan plugin WordPress database backup atau langsung via halaman interface phpMyAdmin.
  2. Optimalkan Database MySQL. Cek overhead table & lakukan table optimizing pada halaman phpMyAdmin setidak-tidaknya sebulan sekali.
  3. Sedia payung sebelum hujan. Lakukan full website backup, tidak menutup kemungkinan error atau gangguan lain pada server bisa menimpa account-account anda yang lain (email, addon domain, subdomain, dlsb) kapan & dimana saja. Jika control panel website anda menggunakan cPanel, lakukan full website backup pada halaman interface cPanel.
Selesai. Semoga bermanfaat.
:)

Disable Auto Login SSL cPanel/WHM Server

Otomatis login menggunakan alamat SSL (https://) → port 2087; pada cPanel/WHM biasanya terjadi setelah ioncube PHP Loader baru saja di install pada server. Berikut cara men-disable SSL login ketika akan akses halaman cPanel/WHM:

» Login ke WHM → Untrusted security certificate, klik I Understand the RisksAdd Exception...

» Add Security Exception centang Permanently store this exception → klik tombol Confirm Security Exception

Login ke WHM sebagai root user.
Untrusted security certificate

Untrusted security certificate

Add Security Exception

Add Security Exception

WHM Login

WHM Login

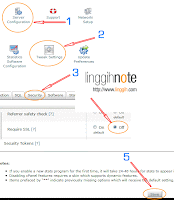
WHMserver configurationtweak settingSecurityRequire SSL [?] → setting ke off → Klik tombol save (lihat Screenshot di bawah).
cPanel/WHM: Disable Auto Login

cPanel/WHM: Disable Auto Login

Save Setting

Save Setting

Logout WHM & login menggunakan port standar WHM (2086)

Selesai. Semoga bermanfaat...
:)
10 Mei 2012

Cegah Hotlinking Via .htaccess

Pertanyaan: Bagaimana cara mencegah orang linking gambar atau video dari situs saya menggunakan file .htaccess?

Yang dimaksud Hotlinking di sini berarti suatu tindakan seseorang yang melinking objek non-HTML dari satu situs asal ke situs lain pada server yang berbeda, dengan subjek linking antara lain file gambar, video dan lain sebagainya. Dampak langsung dari hotlink ini akan akan terlihat pada melonjaknya pemakaian bandwidth anda. Anda dapat mencegah tindakan hotlinking ini dengan cara menggunakan file ".htaccess".

Jika anda sebelumnya sudah mempunyai file ".htaccess", maka cukup dengan menyisipkan kode di bawah pada file ".htaccess" yang sudah ada. Jika belum, buatlah file ".htaccess" baru menggunakan kode di bawah, kemudian upload ke direktori atau sub direktori webserver anda jika menginginkan pencegahan hotlinking ini diterapkan pada folder yang berlainan.

Peringatan:


.htaccess merupakan file konfigurasi yang sangat berpengaruh terhadap accessible suatu website. Meskipun mungkin anda secara tidak sengaja melupakan hal yang sepele (lupa menambahkan spasi misalnya) dapat menyebabkan halaman website tidak akan terbuka (berfungsi) sebagian atau keseluruhan.
Khusus untuk pengguna OS Windows yang ingin membuat file ".htaccess" baru, langkah pertama buatlah file text kosong menggunakan software text editor (notepad misalnya), kemudian simpan dengan nama htaccess.txt. Setelah selesai & semua command (perintah) sudah ditulis dengan benar, upload ke webserver anda. Jangan lupa rename file "htaccess.txt" menjadi ".htaccess".

Peringatan:


Alasan mengapa anda harus menyimpan file tersebut dengan nama "htaccess.txt" adalah karena sebagian besar sistem operasi dan program FTP secara default tidak dapat mengenali (membaca) file ".htaccess". Setelah file "htaccess.txt" berhasil diupload ke webserver, rename file "htaccess.txt" menjadi ".htaccess".
Gunakan command di bawah ini untuk mencegah hotlinking ke situs anda:

Ganti text linggihnote.blogspot.com pada baris ke tiga dengan nama domain anda:


RewriteEngine on
RewriteCond %{HTTP_REFERER} !^$
RewriteCond %{HTTP_REFERER} !^http://(www\.)?linggihnote.blogspot.com/.*$ [NC]
RewriteRule \.(gif|jpg|jpeg|bmp|zip|rar|mp3|flv|swf|xml|php|png|css|pdf)$ - [F]

Menampilkan konten peringatan jika orang terdeteksi melakukan hotlinking ke situs anda.

Anda dapat menampilkan konten peringatan yang akan ditampilkan pada situs orang yang melakukan hotlinking jika tindakan hotlinking ini terdeteksi. Umumnya hal ini dilakukan dengan menampilkan gambar berisi tulisan peringatan "Dilarang Hotlinking", menampilkan gambar orang marah dan lain sebagainya. Caranya dengan menyisipkan kode di bawah ini (Ganti text linggihnote.blogspot.com pada baris 3 dan 4 dengan nama domain anda):


RewriteEngine on
RewriteCond %{HTTP_REFERER} !^$
RewriteCond %{HTTP_REFERER} !^http://(www\.)?linggihnote.blogspot.com/.*$ [NC]
RewriteRule \.(gif|jpg)$ http://www.linggihnote.blogspot.com/dilaranghotlinking.gif [R,L]

Selesai. Semoga bermanfaat.
:)
06 Mei 2012

PHP To JavaScript Converter

Tidak sengaja saya baru saja menemukan script unik di google code, script PHP yang dapat convert File PHP ke JavaScript. Penasaran! Langsung saja ke TKP. Berikut cara sederhana convert file PHP ke JavaScript.

Pertama, persyaratan untuk dapat menjalankan script PHP to JavaScript Converter ini adalah Webserver (Setidaknya Apache Webserver harus terinstall di server). Jika anda punya account hosting, anda bisa langsung melanjutkan tutorial ini. Namun jika tidak ada, tidak masalah. Script ini bisa juga dijalankan oleh Apache yang terinstall pada sistem operasi Windows (menggunakan WAMP Server).

Kedua, code simple PHP to JavaScript Converter. Copy code PHP di bawah ini kemudian simpan dengan nama terserah (bebas). Misal, php2js.php:


<?php
error_reporting(E_ALL);
class PHP2js {
/** @var array holds tokens of the php file being converted */
private $_tokens;
/** @var int number of tokens */
private $count;
/** @var int the current token */
private $current = 0;
/** @var javascript gets collected here */
private $js;

/** @var array these token keys will be converted to their values */
private $_convert = array (
'T_IS_EQUAL'=>'==',
'T_IS_GREATER_OR_EQUAL'=>'>=',
'T_IS_SMALLER_OR_EQUAL'=>'<=',
'T_IS_IDENTICAL'=>'===',
'T_IS_NOT_EQUAL'=>'!=',
'T_IS_NOT_IDENTICAL'=>'!==',
'T_IS_SMALLER_OR_EQUA'=>'<=',
'T_BOOLEAN_AND'=>'&&',
'T_BOOLEAN_OR'=>'||',
'T_CONCAT_EQUAL'=>'+= ',
'T_DIV_EQUAL'=>'/=',
'T_DOUBLE_COLON'=>'.',
'T_INC'=>'++',
'T_MINUS_EQUAL'=>'-=',
'T_MOD_EQUAL'=>'%=',
'T_MUL_EQUAL'=>'*=',
'T_OBJECT_OPERATOR'=>'.',
'T_OR_EQUAL'=>'|=',
'T_PLUS_EQUAL'=>'+=',
'T_SL'=>'<<',
'T_SL_EQUAL'=>'<<=',
'T_SR'=>'>>',
'T_SR_EQUAL'=>'>>=',
'T_START_HEREDOC'=>'<<<',
'T_XOR_EQUAL'=>'^=',
'T_NEW'=>'new',
'T_ELSE'=>'else',
'.'=>'+',
'T_IF'=>'if',
'T_RETURN'=>'return',
'T_AS'=>'in',
'T_WHILE'=>'while',
'T_LOGICAL_AND' => 'AND',
'T_LOGICAL_OR' => 'OR',
'T_LOGICAL_XOR' => 'XOR',
'T_EVAL' => 'eval',
'T_ELSEIF' => 'else if',
'T_BREAK' => 'break',
'T_DOUBLE_ARROW' => ':',
);

/** @var array these tokens stays the same */
private $_keep = array(
'=', ',', '}', '{', ';', '(', ')', '*', '/', '+', '-', '>', '<', '[', ']',
);

/** @var array these tokens keeps their value */
private $_keepValue = array (
'T_CONSTANT_ENCAPSED_STRING', 'T_STRING', 'T_COMMENT', 'T_ML_COMMENT', 'T_DOC_COMMENT', 'T_LNUMBER',
'T_WHITESPACE',
);

/**
* constructor, runs the show
*
* @param string $file path (relative or absolute) to the php file that is converted to js
*/
public function __construct ($file) {
$this->file = $file;
$this->_tokens = $this->getTokens($file);
$this->count = count($this->_tokens)-1;
$this->compileJs();

}

/**
* gets tokens from file. Remove the meta PHP2js stuff.
*
* @param string $file path (relative or absolute) to the php file that is converted to js
* @return array
*/
private function getTokens($file) {
$src = file_get_contents($this->file);
$src = preg_replace ("/\n([\t ]*)require.*PHP2js\.php.*\'.*;/Uis", "", $src);
$src = preg_replace ("/\n([\t ]*)new.*PHP2js.*;/Uis", "", $src);
$this->src = $src;
return token_get_all($src);
}

/**
* loops through tokens and convert to js
*
*/
private function compileJs() {
foreach ($this->_tokens as $_) {
$this->next ($name, $value);
$this->parseToken($name, $value, $this->js);
}
}

/**
* output the js and die
*/
private function renderJs () {
echo "<script>$this->js</script>";
die();
}

/**
* changed referenced args to name and value of next token
*
* @param string $name
* @param string $value
* @param unknown_type $i, the amount of nexts to skip
*/
private function next(& $name, & $value, $i=1) {
for ($j=0; $j<$i; $j++) {
$this->current++;
if ($this->current > $this->count) $this->renderJs();
$_token = $this->_tokens[$this->current];
$this->getToken ($name, $value, $_token);
}
}

/**
* find and return first name matching argument
*
* @param mixed $_tokenNames
* @return string
*/
private function findFirst ($_needles) {
$name = $value = '';
for ($i=$this->current+1; $i<$this->count; $i++) {
$this->getToken($name, $value, $this->_tokens[$i]);
if (in_array($name, (array)$_needles)) {
return $name;
}
}
}

/**
* return javascript until match, match not included
*
* @param array $_needles
* @return string
*/
private function parseUntil ($_needles, $_schema=array(), $includeMatch = false) {
$name = $value = $js = $tmp = '';
while (true) {
$this->next ($name, $value);
$this->parseToken($name, $value, $tmp, $_schema);
if (in_array($name, (array)$_needles)) {
if ($includeMatch === true) {
return $tmp;
} else {
return $js;
}
}
$js = $tmp;
}
}

/**
* tries to find the token in $this->_convert, $this->_keep and $this->_keepValue
* if it fails it tries to find a method named as the token. If fails here also it throws away the token.
*
* @param string $name
* @param string $value
* @param string $js store js here by reference
*/
private function parseToken ($name, $value, & $js, $_schema=array()) {
//custom changes
if (in_array($name, array_keys ((array)$_schema))) {
$js .= $_schema[$name];
//change name to other value
} else if (in_array($name, array_keys ($this->_convert))) {
$js .= (!empty($this->_convert[$name])) ? $this->_convert[$name]: $name;
//keep key
} elseif (in_array($name, $this->_keep)) {
$js .= $name;
//keep value
} elseif (in_array($name, $this->_keepValue)) {
$js .= $value;
//call method
} else {
if (method_exists($this, $name)) {
$js .= $this->$name($value);
}
}
//ignore
}

/**
* converters
*
* These guys are equivalents to tokens.
*/

/**
* class definition
*
* @param sting $value
* @return string
*/
private function T_CLASS($value) {
$this->next ($name, $value, 2);
return "function $value() ";
}

/**
* define function
*
* @param string $value
* @return string
*/
private function T_FUNCTION($value) {
$this->next ($name, $value, 2);
return "this.$value = function";
}

/**
* echo is replaced with document.write
*
* @param string $value
* @return string
*/
private function T_ECHO($value) {
return 'document.write('.$this->parseUntil(';').');';
}

/**
* array. Supports both single and associative
*
* @param string $value
* @return string
*/
private function T_ARRAY($value) {
$_convert = array('('=>'{',     ')'=>'}',);
$js = $this->parseUntil(array(';'), $_convert, true);
if (strpos($js, ':') === false) {
$this->tmp = -1;
$js = preg_replace_callback ('/([{, \t\n])(\'.*\')(|.*:(.*))([,} \t\n])/Uis', array($this, 'cb_T_ARRAY'), $js);
}
return $js;
}

private function cb_T_ARRAY($_matches) {
$this->tmp++;
if (strpos($_matches[0], ':') === false) {
return ($_matches[1].$this->tmp.':'.$_matches[2].$_matches[3].$_matches[4].$_matches[5]);
} else {
return $_matches[0];
}
}
/**
* foreach. Gets converted to for (var blah in blih). Supports as $key=>$value
*
* @param string $value
* @return string
*/
private function T_FOREACH($value) {
$_vars = array();
while (true) {
$this->next ($name, $value);
if ($name == 'T_VARIABLE') $_vars[] = $this->cVar($value);
$this->parseToken($name, $value, $js);
if ($name == '{') {
if (count($_vars) == 2) {
$array = $_vars[0];
$val = $_vars[1];
$this->js .=
"for (var {$val}Val in $array) {".
"\n                        $val = $array"."[{$val}Val];";
}
if (count($_vars) == 3) {
$array = $_vars[0];
$key = $_vars[1];
$val = $_vars[2];
$this->js .=
"for (var $key in $array) {".
"\n                        $val = $array"."[$key];";
}
return '';
}
$jsTmp = $js;
}
}

/**
* declare a public class var
*
* @param string $value
* @return string
*/
private function T_PUBLIC ($value) {
$type = $this->findFirst(array('T_VARIABLE', 'T_FUNCTION'));
if ($type == 'T_FUNCTION') return '';
$js = '';
while (true) {
$this->next ($name, $value);
$this->parseToken($name, $value, $js);
if ($name == ';') {
$js = str_replace(array(' '), '', $js);
return 'this.'.$js;
} else if ($name == '=') {
$js = str_replace(array(' ','='), '', $js);
return 'this.'.$js.' =';
}
}
}

/**
* variable. Remove the $
*
* @param string $value
* @return string
*/
private function T_VARIABLE($value) {
return str_replace('$', '', $value);
}

/* helpers */

private function getToken(& $name, & $value, $_token) {
if (is_array($_token)) {
$name = trim(token_name($_token[0]));
$value = $_token[1];
} else {
$name = trim($_token);
$value = '';
}
}

private function cVar($var) {
return str_replace('$', '', $var);
}

/** debugging stuff. Ugly and deprecated. */

/** deprecated and sucks */
private $_openTags = array(
'T_OPEN_TAG', 'T_CLASS', 'T_PUBLIC', 'T_FOREACH', 'T_ARRAY', '{', 'T_VARIABLE', '('
);

/** deprecated and sucks */

/** deprecated and sucks */
private $indent = 0;
/** deprecated and sucks */
private $debug;


private $_closeTags = array(
'}', 'T_CLOSE_TAG', ';', ')',
);

public function __destruct() {
/**
$js = htmlentities ($this->js);
echo ("<pre>$js</pre>");
$this->write();
echo $this->debug;
//*/
}


private function write() {
$_tokens = token_get_all($this->src);
foreach ($_tokens as $key=>$_token) {
if (is_array($_token)) {
$name = trim(token_name($_token[0]));
$value = $_token[1];
} else {
$name = trim($_token);
$value = '';
}
$this->printToken($name, $value, $_token);
}
}

private function printToken ($name, $value, $_token) {
$value = htmlentities($value);

if (in_array($name, $this->_closeTags)) $this->indent--;
$indent = str_repeat('.&nbsp;&nbsp;&nbsp;&nbsp;', $this->indent);
if (in_array($name, $this->_openTags)) $this->indent++;
if (!empty($value))
$this->debug .= "
<br />$indent
<b>$name&nbsp;&nbsp;=&nbsp;&nbsp;'$value'</b>

";
else
$this->debug .= "
<br />$indent
<b>$name</b>

";
}
}
?>

Upload file php2js.php ke server. Kemudian buat file Baru dengan nama bebas, convert.php misalnya. Isikan convert.php dengan code PHP yang ingin anda convert (di bawah "/* Convert Code Start Here */"), kemudian upload ke web server. Misalnya seperti kode di bawah ini:


<?
require_once 'php2js.php';
new php2js(__FILE__);
/**
* My super cool php class that will be converted to js!!!
*/
/* Convert Code Start Here */
class HelloWorld {
/**
* So here goes a function that echos
*
* @param string $foo
* @param string $bar
*/
function foo($foo, $bar) {
echo $foo . ' ' . $bar;
}
}
$H = new HelloWorld;
$H->foo('Hello', 'World');
?>

Convert PHP To JavaScript

Buka file convert.php pada web browser, hasil yang keluar akan tampak seperti pada gambar Screenshot 1. Untuk melihat code JavaScript hasil convert, jika menggunakan browser Mozilla Firefox klik kanan pada halaman kosong web browser kemudian klik View Page Source (Screenshot 2), atau tekan tombol shortcut Ctrl + U. Pada jendela baru yang terbuka, anda akan melihat source code JavaScript hasil convert (Screenshot 3).


<script>
/**
* My super cool php class that will be converted to js!!!
*/
/* Convert Code Start Here */
function HelloWorld()  {
/**
* So here goes a function that echos
*
* @param string $foo
* @param string $bar
*/
this.foo = function(foo, bar) {
document.write( foo + ' ' + bar);
}
}
H = new HelloWorld;
H.foo('Hello', 'World');
</script>

convert_php_to_javascript1

Screenshot 1

convert_php_to_javascript2

Screenshot 2

convert_php_to_javascript3

Screenshot 3

Selesai. Semoga bermanfaat.
:)
05 Mei 2012

Ubuntu Server "Setup Home Dedicated Server"

Pada kesempatan kali ini saya akan mencoba menuliskan cara install home dedicated server gratis menggunakan komputer rumah. Sistem Operasi yang akan dipakai menggunakan Ubuntu Server 64 bit, aplikasi web yang dipakai menggunakan Apache, MySQL dan PHP, sedangkan script untuk test website akan menggunakan WordPress.

Ada beberapa alasan kenapa harus coba buat dedicated server sendiri di rumah, diantaranya adalah membiasakan diri (latihan) manage dedicated server jika mungkin kedepannya anda berniat untuk sewa dedicated server, bebas untuk modifikasi (coba-coba) server tanpa takut mengeluarkan biaya perbaikan error server dan yang pasti gratis. Sekarang mari mulai!

Syarat Minimal Home Dedicated Server

Yang diperlukan untuk install home dedicated server diantaranya:
  1. Seperangkat komputer (tidak harus bagus / asal komputer bisa berjalan normal) dengan support koneksi internet
  2. CD untuk burning sistem operasi server
  3. Sistem Operasi Server (Server Operating System), pada tutorial ini akan menggunakan Ubuntu Server 64 bit
  4. OpenSSH Server untuk remote server
  5. Aplikasi Web (Web Application), menggunakan Apache, MySQL dan PHP
  6. Firewall untuk membuat batasan akses

Download Ubuntu Server

Download OS Ubuntu server pada halaman ini. Pilih arsitektur OS 32 bit atau 64 bit (untuk RAM/Memory di atas 3 GB), sesuaikan dengan komputer di rumah anda kemudian klik tombol Start download. Setelah download selesai, burn file ISO ke CD menggunakan software burning, Windows Disc Image Burner atau Nero Burning misalnya.
Download Ubuntu Server

Download Ubuntu Server

Panduan burning ISO Ubuntu dapat dilihat pada halaman ini:

https://help.ubuntu.com/community/BurningIsoHowto

Install Ubuntu Server

Setelah Ubuntu Server selesai di burning ke CD, masukkan CD pada CD/DVD Drive kemudian first boot (booting awal) setting ke CD/DVD Drive. Hal ini bisa anda lakukan dengan menekan tombol F2 atau F12 (tergantung mainboard) atau setting urutan booting (boot sequence) pada BIOS.

Setelah berhasil booting ke CD, anda akan melihat tampilan seperti pada gambar di bawah.
Install Ubuntu server

Install Ubuntu server

Pilih bahasa yang tersedia dan tekan tombol Enter. Pada tutorial ini, bahasa yang dipilih adalah Inggris (English). Layar berikutnya pilih Install Ubuntu Server & tekan tombol Enter Screenshot 1. Pilih bahasa default sesuai keinginan anda (Screenshot 2), pada tutorial ini akan menggunakan bahasa Inggris (English).

Screenshot 1

Screenshot 2

Lanjutkan proses install (beberapa screenshot tidak akan ditampilkan sampai step ini) sampai anda diminta untuk menentukan Primary Network Interface (Network Interface Card / NIC). Sesuaikan pilihan anda, pada tutorial ini primary network interface memakai eth0 (Screenshot 4).

Setelah selesai memilih primary network interface, anda akan diminta menentukan hostname (Screenshot 5). Anda bisa menentukan nama apa saja untuk bagian setting hostname ini, misal dengan nama anda (tidak harus subdomain). Pada tutorial ini hostname yang dipakai menggunakan linggih.servehttp.com.

Screenshot 3

Screenshot 4

Screenshot 5

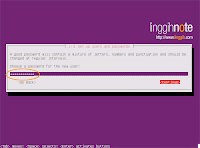
Layar berikutnya setup user & password. Isikan nama lengkap user (Screenshot 6), kemudian tentukan username untuk user baru ini (Screenshot 7). Kemudian tentukan password untuk user yang baru saja dibuat (Screenshot 8), isikan password → tekan tombol Enter. Ketik ulang untuk verifikasi kecocokan password (screenshot 9). Encrypt home directory bebas anda tentukan (Screenshot 10), pada tutorial ini memilih opsi <Yes>. Verifikasi time zone (Screenshot 11), jika sudah benar pilih opsi <Yes> dan tekan Enter untuk melanjutkan.

Screenshot 6

Screenshot 7

Install_Ubuntu_server

Screenshot 8

Install_Ubuntu_server17

Screenshot 9

Install_Ubuntu_server18

Screenshot 10

Install_Ubuntu_server19

Screenshot 11

Sistem akan mendeteksi komponen hardware lainnya (Disk), anda akan diminta menentukan partisi. Pilih opsi Guided – use entire disk (Screenshot 12), tekan Enter.

Pada tutorial ini, hanya ada satu pilihan disk, namun jika pada komputer anda terpasang beberapa disk, opsi pilihan akan akan lebih banyak pada bagian ini (Screenshot 13). Pilih partisi sesuai keinginan anda kemudian tekan Enter.

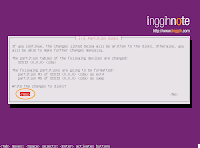
Selanjutnya konfirmasi format partisi disk (Screenshot 14), Pilih <Yes> dan tekan Enter.
Install_Ubuntu_server20

Screenshot 12

Install_Ubuntu_server21

Screenshot 13

Install_Ubuntu_server22

Screenshot 14

Sistem akan mulai proses install untuk beberapa menit ke depan (jangka waktu install tergantung pada hardware yang dipakai). Anda akan diminta submit proxy (Screenshot 16), ini opsional (boleh dikosongkan) jika tidak ada, tekan Enter untuk malanjutkan.

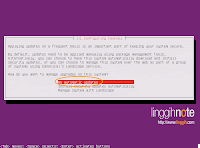
Layar berikutnya opsi update terdapat tiga pilihan (Screenshot 17), pada tutorial ini akan memilih opsi No automatic updates, tekan Enter untuk melanjutkan.
Install_Ubuntu_server23

Screenshot 15

Install_Ubuntu_server24

Screenshot 16

Install_Ubuntu_server25

Screenshot 17

Software selection. Anda akan diberi beberapa pilihan install paket software, pada tutorial ini hanya akan install OpenSSH server (Screenshot 18). Pilih OpenSSH server kemudian tekan tombol Space untuk mengaktifkan (centang), jangan tekan Enter. Jika anda tekan Enter, proses setup akan dilanjutkan tanpa install OpenSSH Server. Jika OpenSSH server sudah tercentang baru tekan Enter.

Proses setup dilanjutkan dengan install software tambahan sesuai dengan opsi yang anda pilih (Screenshot 19). Layar berikutnya Install GRUB boot loader (Screenshot 20), pilih Yes dan tekan Enter.
Install_Ubuntu_server26

Screenshot 18

Install_Ubuntu_server27

Screenshot 19

Install_Ubuntu_server28

Screenshot 20

Proses install selesai (Screenshot 21). Keluarkan CD dari CD/DVD Drive kemudian tekan Enter. Sistem akan otomatis restart dengan sendirinya. Setelah sistem boot up, ketikkan user login & password. Karakter password tidak akan terlihat pada waktu diketikkan, Unix OS memang didesign seperti itu. Jangan panik, terus ketik password kemudian tekan Enter (Screenshot 22). Setelah berhasil login, anda akan melihat tampilan kurang lebih seperti pada gambar Screenshot 23.
Install_Ubuntu_server29

Screenshot 21

Install_Ubuntu_server30

Screenshot 22

Install_Ubuntu_server31

Screenshot 23

Jika sampai step ini tidak ada masalah, Selamat! Ubuntu berhasil diinstall dengan sukses. Sekarang saatnya install komponen tambahan (Web Server Component).

Update Komponen Sistem

Sebelum melanjutkan, pastikan sistem software server up-to-date. Ketikkan sudo aptitude update && sudo aptitude dist-upgrade pada jendela bash untuk update komponen sistem. Anda akan diminta lagi untuk input user password, ketikkan password kemudian tekan Enter.

Anda akan ditanya Do you want to continue? [Y/n/?] (baris 108) untuk melanjutkan proses setup berdasarkan pertimbangan install, remove & upgrade (baris 97 - 107), ketikkan Y dan tekan tombol Enter.


linggih@linggih:~$ sudo aptitude update && sudo aptitude dist-upgrade
[sudo] password for linggih:
Ign http://security.ubuntu.com precise-security InRelease
Ign http://id.archive.ubuntu.com precise InRelease
Ign http://id.archive.ubuntu.com precise-updates InRelease
Ign http://id.archive.ubuntu.com precise-backports InRelease
Get: 1 http://security.ubuntu.com precise-security Release.gpg [198 B]
Get: 2 http://id.archive.ubuntu.com precise Release.gpg [198 B]
Get: 3 http://security.ubuntu.com precise-security Release [49.6 kB]
Get: 4 http://id.archive.ubuntu.com precise-updates Release.gpg [198 B]
Get: 5 http://id.archive.ubuntu.com precise-backports Release.gpg [198 B]
Get: 6 http://id.archive.ubuntu.com precise Release [49.6 kB]
Get: 7 http://id.archive.ubuntu.com precise-updates Release [49.6 kB]
Get: 8 http://security.ubuntu.com precise-security/main Sources [3,873 B]
Get: 9 http://security.ubuntu.com precise-security/restricted Sources [14 B]
Get: 10 http://security.ubuntu.com precise-security/universe Sources [2,143 B]
Get: 11 http://security.ubuntu.com precise-security/multiverse Sources [14 B]
Get: 12 http://security.ubuntu.com precise-security/main amd64 Packages [17.9 kB]
Get: 13 http://id.archive.ubuntu.com precise-backports Release [49.6 kB]
Get: 14 http://security.ubuntu.com precise-security/restricted amd64 Packages [14 B]
Get: 15 http://security.ubuntu.com precise-security/universe amd64 Packages [3,186 B]
Get: 16 http://security.ubuntu.com precise-security/multiverse amd64 Packages [14 B]
Get: 17 http://security.ubuntu.com precise-security/main i386 Packages [17.9 kB]
Get: 18 http://id.archive.ubuntu.com precise/main Sources [934 kB]
Get: 19 http://security.ubuntu.com precise-security/restricted i386 Packages [14 B]
Get: 20 http://security.ubuntu.com precise-security/universe i386 Packages [3,190 B]
Get: 21 http://security.ubuntu.com precise-security/multiverse i386 Packages [14 B]
Hit http://security.ubuntu.com precise-security/main TranslationIndex
Hit http://security.ubuntu.com precise-security/multiverse TranslationIndex
Hit http://security.ubuntu.com precise-security/restricted TranslationIndex
Hit http://security.ubuntu.com precise-security/universe TranslationIndex
Hit http://security.ubuntu.com precise-security/main Translation-en
Hit http://security.ubuntu.com precise-security/multiverse Translation-en
Hit http://security.ubuntu.com precise-security/restricted Translation-en
Hit http://security.ubuntu.com precise-security/universe Translation-en
Get: 22 http://id.archive.ubuntu.com precise/restricted Sources [5,470 B]
Get: 23 http://id.archive.ubuntu.com precise/universe Sources [5,019 kB]
Get: 24 http://id.archive.ubuntu.com precise/multiverse Sources [155 kB]
Get: 25 http://id.archive.ubuntu.com precise/main amd64 Packages [1,273 kB]
Get: 26 http://id.archive.ubuntu.com precise/restricted amd64 Packages [8,452 B]
Get: 27 http://id.archive.ubuntu.com precise/universe amd64 Packages [4,786 kB]
Get: 28 http://id.archive.ubuntu.com precise/multiverse amd64 Packages [119 kB]
Get: 29 http://id.archive.ubuntu.com precise/main i386 Packages [1,274 kB]
Get: 30 http://id.archive.ubuntu.com precise/restricted i386 Packages [8,431 B]
Get: 31 http://id.archive.ubuntu.com precise/universe i386 Packages [4,796 kB]
Get: 32 http://id.archive.ubuntu.com precise/multiverse i386 Packages [121 kB]
Hit http://id.archive.ubuntu.com precise/main TranslationIndex
Hit http://id.archive.ubuntu.com precise/multiverse TranslationIndex
Hit http://id.archive.ubuntu.com precise/restricted TranslationIndex
Hit http://id.archive.ubuntu.com precise/universe TranslationIndex
Get: 33 http://id.archive.ubuntu.com precise-updates/main Sources [12.3 kB]
Get: 34 http://id.archive.ubuntu.com precise-updates/restricted Sources [765 B]
Get: 35 http://id.archive.ubuntu.com precise-updates/universe Sources [4,206 B]
Get: 36 http://id.archive.ubuntu.com precise-updates/multiverse Sources [14 B]
Get: 37 http://id.archive.ubuntu.com precise-updates/main amd64 Packages [36.4 kB]
Get: 38 http://id.archive.ubuntu.com precise-updates/restricted amd64 Packages [757 B]
Get: 39 http://id.archive.ubuntu.com precise-updates/universe amd64 Packages [11.5 kB]
Get: 40 http://id.archive.ubuntu.com precise-updates/multiverse amd64 Packages [14 B]
Get: 41 http://id.archive.ubuntu.com precise-updates/main i386 Packages [37.5 kB]
Get: 42 http://id.archive.ubuntu.com precise-updates/restricted i386 Packages [770 B]
Get: 43 http://id.archive.ubuntu.com precise-updates/universe i386 Packages [11.5 kB]
Get: 44 http://id.archive.ubuntu.com precise-updates/multiverse i386 Packages [14 B]
Hit http://id.archive.ubuntu.com precise-updates/main TranslationIndex
Hit http://id.archive.ubuntu.com precise-updates/multiverse TranslationIndex
Hit http://id.archive.ubuntu.com precise-updates/restricted TranslationIndex
Hit http://id.archive.ubuntu.com precise-updates/universe TranslationIndex
Get: 45 http://id.archive.ubuntu.com precise-backports/main Sources [700 B]
Get: 46 http://id.archive.ubuntu.com precise-backports/restricted Sources [14 B]
Get: 47 http://id.archive.ubuntu.com precise-backports/universe Sources [14 B]
Get: 48 http://id.archive.ubuntu.com precise-backports/multiverse Sources [14 B]
Get: 49 http://id.archive.ubuntu.com precise-backports/main amd64 Packages [559 B]
Get: 50 http://id.archive.ubuntu.com precise-backports/restricted amd64 Packages [14 B]
Get: 51 http://id.archive.ubuntu.com precise-backports/universe amd64 Packages [14 B]
Get: 52 http://id.archive.ubuntu.com precise-backports/multiverse amd64 Packages [14 B]
Get: 53 http://id.archive.ubuntu.com precise-backports/main i386 Packages [559 B]
Get: 54 http://id.archive.ubuntu.com precise-backports/restricted i386 Packages [14 B]
Get: 55 http://id.archive.ubuntu.com precise-backports/universe i386 Packages [14 B]
Get: 56 http://id.archive.ubuntu.com precise-backports/multiverse i386 Packages [14 B]
Hit http://id.archive.ubuntu.com precise-backports/main TranslationIndex
Hit http://id.archive.ubuntu.com precise-backports/multiverse TranslationIndex
Hit http://id.archive.ubuntu.com precise-backports/restricted TranslationIndex
Hit http://id.archive.ubuntu.com precise-backports/universe TranslationIndex
Hit http://id.archive.ubuntu.com precise/main Translation-en
Hit http://id.archive.ubuntu.com precise/multiverse Translation-en
Hit http://id.archive.ubuntu.com precise/restricted Translation-en
Hit http://id.archive.ubuntu.com precise/universe Translation-en
Hit http://id.archive.ubuntu.com precise-updates/main Translation-en
Hit http://id.archive.ubuntu.com precise-updates/multiverse Translation-en
Hit http://id.archive.ubuntu.com precise-updates/restricted Translation-en
Hit http://id.archive.ubuntu.com precise-updates/universe Translation-en
Hit http://id.archive.ubuntu.com precise-backports/main Translation-en
Hit http://id.archive.ubuntu.com precise-backports/multiverse Translation-en
Hit http://id.archive.ubuntu.com precise-backports/restricted Translation-en
Hit http://id.archive.ubuntu.com precise-backports/universe Translation-en
Fetched 18.9 MB in 1min 58s (159 kB/s)

The following NEW packages will be installed:
linux-headers-3.2.0-24{a} linux-headers-3.2.0-24-generic{a}
linux-image-3.2.0-24-generic
The following packages will be REMOVED:
linux-headers-3.2.0-23{u} linux-headers-3.2.0-23-generic{u}
The following packages will be upgraded:
apport libssl1.0.0 libtasn1-3 linux-headers-server linux-image-server
linux-server openssl python-apport python-problem-report
update-manager-core
10 packages upgraded, 3 newly installed, 2 to remove and 0 not upgraded.
Need to get 52.5 MB of archives. After unpacking 149 MB will be used.
Do you want to continue? [Y/n/?] Y
Get: 1 http://id.archive.ubuntu.com/ubuntu/ precise-updates/main linux-headers-3.2.0-24 all 3.2.0-24.37 [11.4 MB]
Get: 2 http://id.archive.ubuntu.com/ubuntu/ precise-updates/main linux-headers-3.2.0-24-generic amd64 3.2.0-24.37 [952 kB]
Get: 3 http://id.archive.ubuntu.com/ubuntu/ precise-updates/main linux-headers-server amd64 3.2.0.24.26 [2,538 B]
Get: 4 http://id.archive.ubuntu.com/ubuntu/ precise-updates/main libssl1.0.0 amd64 1.0.1-4ubuntu5 [1,013 kB]
Get: 5 http://id.archive.ubuntu.com/ubuntu/ precise-updates/main libtasn1-3 amd64 2.10-1ubuntu1.1 [43.3 kB]
Get: 6 http://id.archive.ubuntu.com/ubuntu/ precise-updates/main linux-image-3.2.0-24-generic amd64 3.2.0-24.37 [38.2 MB]
Get: 7 http://id.archive.ubuntu.com/ubuntu/ precise-updates/main openssl amd64 1.0.1-4ubuntu5 [524 kB]
Get: 8 http://id.archive.ubuntu.com/ubuntu/ precise-updates/main update-manager-core amd64 1:0.156.14.1 [181 kB]
Get: 9 http://id.archive.ubuntu.com/ubuntu/ precise-updates/main python-problem-report all 2.0.1-0ubuntu7 [9,550 B]
Get: 10 http://id.archive.ubuntu.com/ubuntu/ precise-updates/main python-apport all 2.0.1-0ubuntu7 [78.2 kB]
Get: 11 http://id.archive.ubuntu.com/ubuntu/ precise-updates/main apport all 2.0.1-0ubuntu7 [141 kB]
Get: 12 http://id.archive.ubuntu.com/ubuntu/ precise-updates/main linux-server amd64 3.2.0.24.26 [1,728 B]
Get: 13 http://id.archive.ubuntu.com/ubuntu/ precise-updates/main linux-image-server amd64 3.2.0.24.26 [2,540 B]
Fetched 52.5 MB in 4min 12s (208 kB/s)
Preconfiguring packages ...
Selecting previously unselected package linux-headers-3.2.0-24.
(Reading database ... 48907 files and directories currently installed.)
Unpacking linux-headers-3.2.0-24 (from .../linux-headers-3.2.0-24_3.2.0-24.37_all.deb) ...
Selecting previously unselected package linux-headers-3.2.0-24-generic.
Unpacking linux-headers-3.2.0-24-generic (from .../linux-headers-3.2.0-24-generic_3.2.0-24.37_amd64.deb) ...
Preparing to replace linux-headers-server 3.2.0.23.25 (using .../linux-headers-server_3.2.0.24.26_amd64.deb) ...
Unpacking replacement linux-headers-server ...
(Reading database ... 70909 files and directories currently installed.)
Removing linux-headers-3.2.0-23-generic ...
Removing linux-headers-3.2.0-23 ...
(Reading database ... 48913 files and directories currently installed.)
Preparing to replace libssl1.0.0 1.0.1-4ubuntu3 (using .../libssl1.0.0_1.0.1-4ubuntu5_amd64.deb) ...
Unpacking replacement libssl1.0.0 ...
Setting up libssl1.0.0 (1.0.1-4ubuntu5) ...
Processing triggers for libc-bin ...
ldconfig deferred processing now taking place
(Reading database ... 48913 files and directories currently installed.)
Preparing to replace libtasn1-3 2.10-1ubuntu1 (using .../libtasn1-3_2.10-1ubuntu1.1_amd64.deb) ...
Unpacking replacement libtasn1-3 ...
Selecting previously unselected package linux-image-3.2.0-24-generic.
Unpacking linux-image-3.2.0-24-generic (from .../linux-image-3.2.0-24-generic_3.2.0-24.37_amd64.deb) ...
Done.
Preparing to replace openssl 1.0.1-4ubuntu3 (using .../openssl_1.0.1-4ubuntu5_amd64.deb) ...
Unpacking replacement openssl ...
Preparing to replace update-manager-core 1:0.156.14 (using .../update-manager-core_1%3a0.156.14.1_amd64.deb) ...
Unpacking replacement update-manager-core ...
Preparing to replace python-problem-report 2.0.1-0ubuntu5 (using .../python-problem-report_2.0.1-0ubuntu7_all.deb) ...
Unpacking replacement python-problem-report ...
Preparing to replace python-apport 2.0.1-0ubuntu5 (using .../python-apport_2.0.1-0ubuntu7_all.deb) ...
Unpacking replacement python-apport ...
Preparing to replace apport 2.0.1-0ubuntu5 (using .../apport_2.0.1-0ubuntu7_all.deb) ...
apport stop/waiting
Unpacking replacement apport ...
Preparing to replace linux-server 3.2.0.23.25 (using .../linux-server_3.2.0.24.26_amd64.deb) ...
Unpacking replacement linux-server ...
Preparing to replace linux-image-server 3.2.0.23.25 (using .../linux-image-server_3.2.0.24.26_amd64.deb) ...
Unpacking replacement linux-image-server ...
Processing triggers for man-db ...
Processing triggers for ureadahead ...
ureadahead will be reprofiled on next reboot
Setting up linux-headers-3.2.0-24 (3.2.0-24.37) ...
Setting up linux-headers-3.2.0-24-generic (3.2.0-24.37) ...
Setting up linux-headers-server (3.2.0.24.26) ...
Setting up libtasn1-3 (2.10-1ubuntu1.1) ...
Setting up linux-image-3.2.0-24-generic (3.2.0-24.37) ...
Running depmod.
update-initramfs: deferring update (hook will be called later)
Examining /etc/kernel/postinst.d.
run-parts: executing /etc/kernel/postinst.d/initramfs-tools 3.2.0-24-generic /boot/vmlinuz-3.2.0-24-generic
update-initramfs: Generating /boot/initrd.img-3.2.0-24-generic
run-parts: executing /etc/kernel/postinst.d/update-notifier 3.2.0-24-generic /boot/vmlinuz-3.2.0-24-generic
run-parts: executing /etc/kernel/postinst.d/zz-update-grub 3.2.0-24-generic /boot/vmlinuz-3.2.0-24-generic
Generating grub.cfg ...
Found linux image: /boot/vmlinuz-3.2.0-24-generic
Found initrd image: /boot/initrd.img-3.2.0-24-generic
Found linux image: /boot/vmlinuz-3.2.0-23-generic
Found initrd image: /boot/initrd.img-3.2.0-23-generic
Found memtest86+ image: /boot/memtest86+.bin
done
Setting up openssl (1.0.1-4ubuntu5) ...
Setting up update-manager-core (1:0.156.14.1) ...
Setting up python-problem-report (2.0.1-0ubuntu7) ...
Setting up python-apport (2.0.1-0ubuntu7) ...
Setting up apport (2.0.1-0ubuntu7) ...
apport start/running
Setting up linux-image-server (3.2.0.24.26) ...
Setting up linux-server (3.2.0.24.26) ...
Processing triggers for libc-bin ...
ldconfig deferred processing now taking place

Current status: 0 updates [-10].
linggih@linggih:~$

Setelah anda konfirmasi, sistem akan download dan install komponen update. Lama proses download & install ini tergantung dari koneksi kecepatan internet anda. Setelah update selesai, restart komputer untuk apply komponen update dengan mengetikkan command sudo shutdown -r now.


linggih@linggih:~$ sudo shutdown -r now
linggih@linggih:~$
Broadcast message from linggih@linggih
(/dev/pts/0) at 18:31 ...

The system is going down for reboot NOW!


Install Apache, MySQL & PHP

Sekarang saatnya install komponen aplikasi web. Syarat situs/website anda dapat diakses via internet, web server terlebih dahulu harus terinstall pada mesin server. Pada tutorial ini akan menggunakan web server Apache, database server menggunakan MySQL & server-side language menggunakan PHP.

Ketiga komponen aplikasi web ini sudah cukup untuk menjalankan script website/blog. Setelah ketiganya terinstall, akan dilanjutkan dengan install script WordPress untuk test website.

Install program pada Unix OS Ubuntu berbeda dengan install program pada OS seperti Windows atau OS lainya. Pada Ubuntu program harus di download & install menggunakan command line.

Untuk mulai install Apache Web Server, MySQL Database Server & PHP, ketikkan command berikut:

sudo aptitude install apache2 php5-mysql libapache2-mod-php5 mysql-server

Package manager akan download & install paket program sesuai dengan command di atas dan juga download & install dependencies tambahan jika tersedia.


linggih@linggih:~$ sudo aptitude install apache2 php5-mysql libapache2-mod-php5 mysql-server
....
....
....
php5-mysql ssl-cert{a}
0 packages upgraded, 28 newly installed, 0 to remove and 0 not upgraded.
Need to get 35.7 MB of archives. After unpacking 121 MB will be used.
The following packages have unmet dependencies:
apache2-mpm-worker : Conflicts: apache2-mpm which is a virtual package.
apache2-mpm-prefork : Conflicts: apache2-mpm which is a virtual package.
The following actions will resolve these dependencies:

Keep the following packages at their current version:
1)     apache2-mpm-worker [Not Installed]


Accept this solution? [Y/n/q/?] Y
The following NEW packages will be installed:
apache2 apache2-mpm-prefork{a} apache2-utils{a} apache2.2-bin{a}
apache2.2-common{a} libapache2-mod-php5 libapr1{a} libaprutil1{a}
libaprutil1-dbd-sqlite3{a} libaprutil1-ldap{a} libcap2{a}
libdbd-mysql-perl{a} libdbi-perl{a} libhtml-template-perl{a}
libmysqlclient18{a} libnet-daemon-perl{a} libplrpc-perl{a}
mysql-client-5.5{a} mysql-client-core-5.5{a} mysql-common{a} mysql-server
mysql-server-5.5{a} mysql-server-core-5.5{a} php5-cli{a} php5-common{a}
php5-mysql ssl-cert{a}
0 packages upgraded, 27 newly installed, 0 to remove and 0 not upgraded.
Need to get 35.7 MB of archives. After unpacking 121 MB will be used.
Do you want to continue? [Y/n/?] Y
Get: 1 http://id.archive.ubuntu.com/ubuntu/ precise/main libcap2 amd64 1:2.22-1ubuntu3 [12.0 kB]
Get: 2 http://id.archive.ubuntu.com/ubuntu/ precise/main mysql-common all 5.5.22-0ubuntu1 [13.7 kB]
Get: 3 http://id.archive.ubuntu.com/ubuntu/ precise/main libmysqlclient18 amd64 5.5.22-0ubuntu1 [946 kB]
Get: 4 http://id.archive.ubuntu.com/ubuntu/ precise/main libnet-daemon-perl all 0.48-1 [43.1 kB]
Get: 5 http://id.archive.ubuntu.com/ubuntu/ precise/main libplrpc-perl all 0.2020-2 [36.0 kB]
Get: 6 http://id.archive.ubuntu.com/ubuntu/ precise/main libdbi-perl amd64 1.616-1build2 [849 kB]
Get: 7 http://id.archive.ubuntu.com/ubuntu/ precise/main libdbd-mysql-perl amd64 4.020-1build2 [106 kB]
Get: 8 http://id.archive.ubuntu.com/ubuntu/ precise/main mysql-client-core-5.5 amd64 5.5.22-0ubuntu1 [1,926 kB]
Get: 9 http://id.archive.ubuntu.com/ubuntu/ precise/main mysql-client-5.5 amd64 5.5.22-0ubuntu1 [8,298 kB]
Get: 10 http://id.archive.ubuntu.com/ubuntu/ precise/main mysql-server-core-5.5 amd64 5.5.22-0ubuntu1 [6,022 kB]
Get: 11 http://id.archive.ubuntu.com/ubuntu/ precise/main mysql-server-5.5 amd64 5.5.22-0ubuntu1 [8,816 kB]
Get: 12 http://id.archive.ubuntu.com/ubuntu/ precise/main libapr1 amd64 1.4.6-1 [89.6 kB]
Get: 13 http://id.archive.ubuntu.com/ubuntu/ precise/main libaprutil1 amd64 1.3.12+dfsg-3 [74.6 kB]
Get: 14 http://id.archive.ubuntu.com/ubuntu/ precise/main libaprutil1-dbd-sqlite3 amd64 1.3.12+dfsg-3 [10.4 kB]
Get: 15 http://id.archive.ubuntu.com/ubuntu/ precise/main libaprutil1-ldap amd64 1.3.12+dfsg-3 [8,044 B]
Get: 16 http://id.archive.ubuntu.com/ubuntu/ precise/main apache2.2-bin amd64 2.2.22-1ubuntu1 [1,337 kB]
Get: 17 http://id.archive.ubuntu.com/ubuntu/ precise/main apache2-utils amd64 2.2.22-1ubuntu1 [91.0 kB]
Get: 18 http://id.archive.ubuntu.com/ubuntu/ precise/main apache2.2-common amd64 2.2.22-1ubuntu1 [228 kB]
Get: 19 http://id.archive.ubuntu.com/ubuntu/ precise/main apache2-mpm-prefork amd64 2.2.22-1ubuntu1 [2,402 B]
Get: 20 http://id.archive.ubuntu.com/ubuntu/ precise/main apache2 amd64 2.2.22-1ubuntu1 [1,484 B]
Get: 21 http://id.archive.ubuntu.com/ubuntu/ precise/main php5-common amd64 5.3.10-1ubuntu3 [430 kB]
Get: 22 http://id.archive.ubuntu.com/ubuntu/ precise/main libapache2-mod-php5 amd64 5.3.10-1ubuntu3 [3,136 kB]
Get: 23 http://id.archive.ubuntu.com/ubuntu/ precise/main libhtml-template-perl all 2.10-1 [65.0 kB]
Get: 24 http://id.archive.ubuntu.com/ubuntu/ precise/main mysql-server all 5.5.22-0ubuntu1 [11.8 kB]
Get: 25 http://id.archive.ubuntu.com/ubuntu/ precise/main php5-cli amd64 5.3.10-1ubuntu3 [3,050 kB]
Get: 26 http://id.archive.ubuntu.com/ubuntu/ precise/main php5-mysql amd64 5.3.10-1ubuntu3 [76.6 kB]
Get: 27 http://id.archive.ubuntu.com/ubuntu/ precise/main ssl-cert all 1.0.28 [12.2 kB]
Fetched 35.7 MB in 2min 34s (231 kB/s)
Preconfiguring packages ...
Selecting previously unselected package libcap2.
(Reading database ... 53039 files and directories currently installed.)
Unpacking libcap2 (from .../libcap2_1%3a2.22-1ubuntu3_amd64.deb) ...
Selecting previously unselected package mysql-common.
Unpacking mysql-common (from .../mysql-common_5.5.22-0ubuntu1_all.deb) ...
Selecting previously unselected package libmysqlclient18.
Unpacking libmysqlclient18 (from .../libmysqlclient18_5.5.22-0ubuntu1_amd64.deb) ...
Selecting previously unselected package libnet-daemon-perl.
Unpacking libnet-daemon-perl (from .../libnet-daemon-perl_0.48-1_all.deb) ...
Selecting previously unselected package libplrpc-perl.
Unpacking libplrpc-perl (from .../libplrpc-perl_0.2020-2_all.deb) ...
Selecting previously unselected package libdbi-perl.
Unpacking libdbi-perl (from .../libdbi-perl_1.616-1build2_amd64.deb) ...
Selecting previously unselected package libdbd-mysql-perl.
Unpacking libdbd-mysql-perl (from .../libdbd-mysql-perl_4.020-1build2_amd64.deb) ...
Selecting previously unselected package mysql-client-core-5.5.
Unpacking mysql-client-core-5.5 (from .../mysql-client-core-5.5_5.5.22-0ubuntu1_amd64.deb) ...
Selecting previously unselected package mysql-client-5.5.
Unpacking mysql-client-5.5 (from .../mysql-client-5.5_5.5.22-0ubuntu1_amd64.deb) ...
Selecting previously unselected package mysql-server-core-5.5.
Unpacking mysql-server-core-5.5 (from .../mysql-server-core-5.5_5.5.22-0ubuntu1_amd64.deb) ...
Processing triggers for man-db ...
Setting up mysql-common (5.5.22-0ubuntu1) ...
Selecting previously unselected package mysql-server-5.5.
(Reading database ... 53410 files and directories currently installed.)
Unpacking mysql-server-5.5 (from .../mysql-server-5.5_5.5.22-0ubuntu1_amd64.deb) ...
Selecting previously unselected package libapr1.
Unpacking libapr1 (from .../libapr1_1.4.6-1_amd64.deb) ...
Selecting previously unselected package libaprutil1.
Unpacking libaprutil1 (from .../libaprutil1_1.3.12+dfsg-3_amd64.deb) ...
Selecting previously unselected package libaprutil1-dbd-sqlite3.
Unpacking libaprutil1-dbd-sqlite3 (from .../libaprutil1-dbd-sqlite3_1.3.12+dfsg-3_amd64.deb) ...
Selecting previously unselected package libaprutil1-ldap.
Unpacking libaprutil1-ldap (from .../libaprutil1-ldap_1.3.12+dfsg-3_amd64.deb) ...
Selecting previously unselected package apache2.2-bin.
Unpacking apache2.2-bin (from .../apache2.2-bin_2.2.22-1ubuntu1_amd64.deb) ...
Selecting previously unselected package apache2-utils.
Unpacking apache2-utils (from .../apache2-utils_2.2.22-1ubuntu1_amd64.deb) ...
Selecting previously unselected package apache2.2-common.
Unpacking apache2.2-common (from .../apache2.2-common_2.2.22-1ubuntu1_amd64.deb) ...
Selecting previously unselected package apache2-mpm-prefork.
Unpacking apache2-mpm-prefork (from .../apache2-mpm-prefork_2.2.22-1ubuntu1_amd64.deb) ...
Selecting previously unselected package apache2.
Unpacking apache2 (from .../apache2_2.2.22-1ubuntu1_amd64.deb) ...
Selecting previously unselected package php5-common.
Unpacking php5-common (from .../php5-common_5.3.10-1ubuntu3_amd64.deb) ...
Selecting previously unselected package libapache2-mod-php5.
Unpacking libapache2-mod-php5 (from .../libapache2-mod-php5_5.3.10-1ubuntu3_amd64.deb) ...
Selecting previously unselected package libhtml-template-perl.
Unpacking libhtml-template-perl (from .../libhtml-template-perl_2.10-1_all.deb) ...
Selecting previously unselected package mysql-server.
Unpacking mysql-server (from .../mysql-server_5.5.22-0ubuntu1_all.deb) ...
Selecting previously unselected package php5-cli.
Unpacking php5-cli (from .../php5-cli_5.3.10-1ubuntu3_amd64.deb) ...
Selecting previously unselected package php5-mysql.
Unpacking php5-mysql (from .../php5-mysql_5.3.10-1ubuntu3_amd64.deb) ...
Selecting previously unselected package ssl-cert.
Unpacking ssl-cert (from .../ssl-cert_1.0.28_all.deb) ...
Processing triggers for ureadahead ...
ureadahead will be reprofiled on next reboot
Processing triggers for man-db ...
Processing triggers for ufw ...
Setting up libcap2 (1:2.22-1ubuntu3) ...
Setting up libmysqlclient18 (5.5.22-0ubuntu1) ...
Setting up libnet-daemon-perl (0.48-1) ...
Setting up libplrpc-perl (0.2020-2) ...
Setting up libdbi-perl (1.616-1build2) ...
Setting up libdbd-mysql-perl (4.020-1build2) ...
Setting up mysql-client-core-5.5 (5.5.22-0ubuntu1) ...
Setting up mysql-client-5.5 (5.5.22-0ubuntu1) ...
Setting up mysql-server-core-5.5 (5.5.22-0ubuntu1) ...
Setting up mysql-server-5.5 (5.5.22-0ubuntu1) ...
120503 18:58:40 [Note] Plugin 'FEDERATED' is disabled.
120503 18:58:40 InnoDB: The InnoDB memory heap is disabled
120503 18:58:40 InnoDB: Mutexes and rw_locks use GCC atomic builtins
120503 18:58:40 InnoDB: Compressed tables use zlib 1.2.3.4
120503 18:58:40 InnoDB: Initializing buffer pool, size = 128.0M
120503 18:58:40 InnoDB: Completed initialization of buffer pool
120503 18:58:40 InnoDB: highest supported file format is Barracuda.
120503 18:58:40  InnoDB: Waiting for the background threads to start
120503 18:58:41 InnoDB: 1.1.8 started; log sequence number 1595675
120503 18:58:41  InnoDB: Starting shutdown...
120503 18:58:42  InnoDB: Shutdown completed; log sequence number 1595675
mysql start/running, process 3380
Setting up libapr1 (1.4.6-1) ...
Setting up libaprutil1 (1.3.12+dfsg-3) ...
Setting up libaprutil1-dbd-sqlite3 (1.3.12+dfsg-3) ...
Setting up libaprutil1-ldap (1.3.12+dfsg-3) ...
Setting up apache2.2-bin (2.2.22-1ubuntu1) ...
Setting up apache2-utils (2.2.22-1ubuntu1) ...
Setting up apache2.2-common (2.2.22-1ubuntu1) ...
Enabling site default.
Enabling module alias.
Enabling module autoindex.
Enabling module dir.
Enabling module env.
Enabling module mime.
Enabling module negotiation.
Enabling module setenvif.
Enabling module status.
Enabling module auth_basic.
Enabling module deflate.
Enabling module authz_default.
Enabling module authz_user.
Enabling module authz_groupfile.
Enabling module authn_file.
Enabling module authz_host.
Enabling module reqtimeout.
Setting up apache2-mpm-prefork (2.2.22-1ubuntu1) ...
* Starting web server apache2                                           [ OK ]
Setting up apache2 (2.2.22-1ubuntu1) ...
Setting up php5-common (5.3.10-1ubuntu3) ...
Setting up libapache2-mod-php5 (5.3.10-1ubuntu3) ...

Creating config file /etc/php5/apache2/php.ini with new version
* Restarting web server apache2                                                 ... waiting                                                             [ OK ]
Setting up libhtml-template-perl (2.10-1) ...
Setting up mysql-server (5.5.22-0ubuntu1) ...
Setting up php5-cli (5.3.10-1ubuntu3) ...

Creating config file /etc/php5/cli/php.ini with new version
update-alternatives: using /usr/bin/php5 to provide /usr/bin/php (php) in auto mode.
Setting up php5-mysql (5.3.10-1ubuntu3) ...
Setting up ssl-cert (1.0.28) ...
Processing triggers for libc-bin ...
ldconfig deferred processing now taking place

linggih@linggih:~$

Selama proses install, MySQL akan meminta anda setting password root. Jangan sampai dikosongkan step setup password ini, pastikan password yang anda buat cukup rumit untuk ditebak. Ketikkan password root (Screenshot 24) → tekan Enter, dan ketik ulang password (Screenshot 25) → tekan Enter.
Install_Ubuntu_server31

Screenshot 24

Install_Ubuntu_server32

Screenshot 25

Berikutnya, test web server apakah sudah aktif. Untuk test, pertama cari informasi IP Server dengan mengetikkan command:

ifconfig | grep inet (baris 1) atau ifconfig -a (baris 7). Data IP pada tutorial ini, webserver bisa diakses dengan alamat IP 192.168.111.131 (baris 2) atau 192.168.1.8 (baris 4). Atau subdomain hostname (hostname sebelumnya disetup menggunakan linggih.servehttp.com).


linggih@linggih:~$ ifconfig | grep inet
inet addr:192.168.111.131  Bcast:192.168.111.255  Mask:255.255.255.0
inet6 addr: fe80::20c:29ff:fe83:1376/64 Scope:Link
inet addr:192.168.1.8  Bcast:255.255.255.255  Mask:255.255.255.0
inet addr:127.0.0.1  Mask:255.0.0.0
inet6 addr: ::1/128 Scope:Host
linggih@linggih:~$ ifconfig -a
eth0      Link encap:Ethernet  HWaddr 00:0c:29:83:13:76
inet addr:192.168.111.131  Bcast:192.168.111.255  Mask:255.255.255.0
inet6 addr: fe80::20c:29ff:fe83:1376/64 Scope:Link
UP BROADCAST RUNNING MULTICAST  MTU:1500  Metric:1
RX packets:26459 errors:0 dropped:0 overruns:0 frame:0
TX packets:14528 errors:0 dropped:0 overruns:0 carrier:0
collisions:0 txqueuelen:1000
RX bytes:37203057 (37.2 MB)  TX bytes:1032616 (1.0 MB)

eth1      Link encap:Ethernet  HWaddr 00:0c:29:83:13:80
inet addr:192.168.1.8  Bcast:255.255.255.255  Mask:255.255.255.0
UP BROADCAST RUNNING MULTICAST  MTU:576  Metric:1
RX packets:29 errors:0 dropped:0 overruns:0 frame:0
TX packets:12 errors:0 dropped:0 overruns:0 carrier:0
collisions:0 txqueuelen:1000
RX bytes:4950 (4.9 KB)  TX bytes:3270 (3.2 KB)

lo        Link encap:Local Loopback
inet addr:127.0.0.1  Mask:255.0.0.0
inet6 addr: ::1/128 Scope:Host
UP LOOPBACK RUNNING  MTU:16436  Metric:1
RX packets:56 errors:0 dropped:0 overruns:0 frame:0
TX packets:56 errors:0 dropped:0 overruns:0 carrier:0
collisions:0 txqueuelen:0
RX bytes:4592 (4.5 KB)  TX bytes:4592 (4.5 KB)

linggih@linggih:~$

Copy dan paste alamat ip pada web browser, kemudian tekan enter. Jika webserver sudah berjalan & aktif, halaman default index server Ubuntu yang akan muncul kurang lebih bertuliskan: "It works! This is the default web page for this server. The web server software is running but no content has been added, yet." (Screenshot 26).
Install_Ubuntu_server33

Screenshot 26

Untuk alasan memperkecil resiko user melihat celah keamanan pada informasi Apache atau PHP, edit konfigurasi security berikut ini. Pertama backup dulu file security Apache dengan mengetikkan command:

sudo cp /etc/apache2/conf.d/security /etc/apache2/conf.d/security.backup


linggih@linggih:~$ sudo cp /etc/apache2/conf.d/security /etc/apache2/conf.d/security.backup
linggih@linggih:~$

Buka dan edit file security Apache dengan mengetikkan command:

sudo nano /etc/apache2/conf.d/security

Cari dan ganti ServerTokens OS ke ServerTokens Prod (code baris ke-9). Kedua, ganti ServerSignature On ke ServerSignature Off (code baris ke-20). Tekan tombol Ctrl + O untuk simpan perubahan, kemudian tekan tombol Ctrl + X untuk keluar text editor.


# ServerTokens
# This directive configures what you return as the Server HTTP response
# Header. The default is 'Full' which sends information about the OS-Type
# and compiled in modules.
# Set to one of:  Full | OS | Minimal | Minor | Major | Prod
# where Full conveys the most information, and Prod the least.
#
#ServerTokens Minimal
ServerTokens Prod
#ServerTokens Full

#
# Optionally add a line containing the server version and virtual host
# name to server-generated pages (internal error documents, FTP directory
# listings, mod_status and mod_info output etc., but not CGI generated
# documents or custom error documents).
# Set to "EMail" to also include a mailto: link to the ServerAdmin.
# Set to one of:  On | Off | EMail
#
ServerSignature Off
#ServerSignature On

Sekarang, edit file konfigurasi PHP. Pertama backup dulu file konfigurasi PHP dengan mengetikkan command:

sudo cp /etc/php5/apache2/php.ini /etc/php5/apache2/php.ini.backup

Buka file konfigurasi php dengan mengetikkan command:

sudo nano /etc/php5/apache2/php.ini

Ganti expose_php = On ke expose_php = Off (code baris ke-10).


;;;;;;;;;;;;;;;;;
; Miscellaneous ;
;;;;;;;;;;;;;;;;;

; Decides whether PHP may expose the fact that it is installed on the server
; (e.g. by adding its signature to the Web server header).  It is no security
; threat in any way, but it makes it possible to determine whether you use PHP
; on your server or not.
; http://php.net/expose-php
expose_php = Off

Tekan tombol Ctrl + O untuk simpan perubahan, kemudian tekan tombol Ctrl + X untuk keluar text editor. Selanjutnya restart Apache web server dengan mengetikkan command:

sudo /etc/init.d/apache2 restart


root@linggih:~# /etc/init.d/apache2 restart
* Restarting web server apache2                                                 ... waiting                                                             [ OK ]
root@linggih:~#

Setting Apache Web Server, MySQL, and PHP selesai.

Konfigurasi Firewall

Cek status Firewall apakah aktif atau tidak dengan mengetikkan command sudo ufw status. Dua kemungkinan status:


root@linggih:~# sudo ufw status
Status: inactive

atau


root@linggih:~# sudo ufw status
Status: active

Jika firewall tidak aktif (Status: inactive), aktifkan firewall dengan mengetikkan command sudo ufw enable. Pesan konfirmasi Proceed with operation (y|n)?, ketikkan y dan tekan Enter.


root@linggih:~# sudo ufw enable
Command may disrupt existing ssh connections. Proceed with operation (y|n)? y
Firewall is active and enabled on system startup
linggih@linggih:~$

Firewall pada Ubuntu Server setting default terinstall belum ada rule. Pada tutorial ini akan setting rule baru untuk allow port HTTP (80) dan SSH (22).

Allow port 80 (HTTP) dengan mengetikkan command:

sudo ufw allow 80


linggih@linggih:~$ sudo ufw allow 80
Rule added
Rule added (v6)
linggih@linggih:~$

Kemudian allow port SSH (22) dengan mengetikkan command:

sudo ufw allow 22


linggih@linggih:~$ sudo ufw allow 22
Rule added
Rule added (v6)

Jika diperlukan, reboot server dengan mengetikkan command:

sudo shutdown -r now

Install Script Website

Setelah Apache, MySQL, PHP terinstall & firewall sudah di setting, sekarang saatnya setup website untuk mengganti (replace) halaman default apache (index.html) yang terletak pada direktori folder /var/www.

Mulai tahapan Install script WordPress:
  1. Untuk memudahkan setting script WordPress, pada tutorial ini terlebih dahulu setup user root dengan mengetikkan command:

    sudo passwd root

    Ketikkan password root & ketik ulang password root.


    linggih@linggih:~$ sudo passwd root
    Enter new UNIX password:
    Retype new UNIX password:
    passwd: password updated successfully
    linggih@linggih:~$

  2. Kemudian login root user dengan mengetikkan command:

    su root

    Ketikkan password root dan tekan Enter.


    linggih@linggih:~$ su root
    Password:
    root@linggih:/home/linggih#

  3. Setelah login root user, rename file index.html yang terletak pada direktori folder /var/www menjadi index.html.backup dengan mengetikkan command;
    mv /var/www/index.html /var/www/index.html.backup


    root@linggih:/home/linggih# mv /var/www/index.html /var/www/index.html.backup
    root@linggih:/home/linggih#

  4. Masuk ke direktori folder /var dengan mengetikkan command cd /var


    root@linggih:/home/linggih# cd /var
    root@linggih:/var#

  5. Download Script WordPress dengan mengetikkan command wget http://wordpress.org/latest.tar.gz


    root@linggih:/var# wget http://wordpress.org/latest.tar.gz
    --2012-05-04 13:56:41--  http://wordpress.org/latest.tar.gz
    Resolving wordpress.org (wordpress.org)... 72.233.56.139, 72.233.56.138
    Connecting to wordpress.org (wordpress.org)|72.233.56.139|:80... connected.
    HTTP request sent, awaiting response... 200 OK
    Length: unspecified [application/x-gzip]
    Saving to: `latest.tar.gz'
    
    [        <=>                            ] 3,883,667    234K/s   in 19s
    
    2012-05-04 13:57:01 (204 KB/s) - `latest.tar.gz' saved [3883667]
    
    root@linggih:/var#

  6. Untar (Extract) file dengan mengetikkan command tar -xvzf latest.tar.gz


    root@linggih:/var# tar -xvzf latest.tar.gz
    wordpress/
    wordpress/license.txt
    wordpress/wp-activate.php
    ...
    ...
    wordpress/wp-admin/css/
    wordpress/wp-admin/css/ie.css
    wordpress/wp-admin/css/farbtastic.css
    wordpress/wp-admin/css/wp-admin-rtl.css
    wordpress/wp-admin/css/ie-rtl.css
    ...
    ...
    wordpress/wp-admin/js/
    wordpress/wp-admin/js/common.js
    wordpress/wp-admin/js/editor.dev.js
    ...
    ...
    wordpress/wp-admin/js/set-post-thumbnail.dev.js
    wordpress/wp-admin/js/post.js
    wordpress/wp-admin/js/image-edit.js
    wordpress/wp-admin/js/inline-edit-post.dev.js
    ...
    ...
    wordpress/wp-admin/images/button-grad.png
    wordpress/wp-admin/images/wp-logo-vs.png
    wordpress/wp-admin/images/media-button-video.gif
    wordpress/wp-admin/images/media-button-image.gif
    wordpress/wp-admin/images/archive-link.png
    ...
    ...
    wordpress/wp-admin/images/screenshots/welcome-screen.png
    wordpress/wp-admin/images/screenshots/coediting.png
    wordpress/wp-admin/images/screenshots/media-icon.png
    ...
    ...
    wordpress/wp-admin/menu-header.php
    wordpress/wp-admin/post-new.php
    wordpress/wp-admin/user-new.php
    wordpress/wp-admin/link-manager.php
    wordpress/wp-admin/theme-editor.php
    ...
    ...
    wordpress/wp-admin/network/admin.php
    wordpress/wp-admin/network/users.php
    wordpress/wp-admin/network/sites.php
    ...
    ...
    wordpress/wp-admin/includes/class-wp-filesystem-base.php
    wordpress/wp-admin/includes/class-wp-links-list-table.php
    wordpress/wp-admin/includes/import.php
    wordpress/wp-admin/includes/dashboard.php
    ...
    ...
    wordpress/wp-includes/class-wp.php
    wordpress/wp-includes/class-IXR.php
    wordpress/wp-includes/feed-rss2-comments.php
    wordpress/wp-includes/class-smtp.php
    ...
    ...
    wordpress/wp-includes/class-wp-admin-bar.php
    wordpress/wp-includes/class.wp-scripts.php
    wordpress/wp-includes/atomlib.php
    wordpress/wp-includes/default-constants.php
    ...
    ...
    wordpress/wp-includes/js/plupload/handlers.dev.js
    wordpress/wp-includes/js/plupload/plupload.silverlight.js
    wordpress/wp-includes/js/wplink.js
    wordpress/wp-includes/js/tw-sack.js
    wordpress/wp-includes/js/quicktags.dev.js
    ...
    ...
    wordpress/wp-includes/js/tinymce/themes/advanced/js/source_editor.js
    wordpress/wp-includes/js/tinymce/themes/advanced/js/anchor.js
    wordpress/wp-includes/js/tinymce/themes/advanced/js/about.js
    wordpress/wp-includes/js/tinymce/themes/advanced/js/link.js
    ...
    ...
    wordpress/wp-includes/functions.wp-scripts.php
    wordpress/wp-includes/link-template.php
    wordpress/wp-includes/bookmark-template.php
    wordpress/wp-includes/author-template.php
    wordpress/wp-includes/locale.php
    ...
    ...
    wordpress/wp-content/themes/twentyeleven/images/headers/
    wordpress/wp-content/themes/twentyeleven/images/headers/shore-thumbnail.jpg
    wordpress/wp-content/themes/twentyeleven/images/headers/hanoi.jpg
    wordpress/wp-content/themes/twentyeleven/images/headers/lanterns.jpg
    ...
    ...
    wordpress/wp-links-opml.php
    wordpress/wp-comments-post.php
    wordpress/wp-app.php
    root@linggih:/var#

  7. Pindahkan konten script yang baru saja terekstract ke direktori /www dengan mengetikkan command:

    mv wordpress/* www/


    root@linggih:/var# mv wordpress/* www/
    root@linggih:/var#

  8. Selanjutnya buat user dan database MySQL. Login ke MySQL server sebagai user root dengan mengetikkan command mysql -u root -p, kemudian ketikkan password root dan tekan enter. Buat database, user & setting password baru, pada tutorial ini database yang akan dibuat wordpressdb, user baru adalah wordpress dengan password wordpresspass.
    • Untuk buat database baru ketikkan command:

      CREATE DATABASE wordpressdb; (lihat code baris ke-15)
    • Untuk setting user & password, ketikkan command:

      CREATE USER 'wordpress'@'localhost' IDENTIFIED BY 'wordpresspass'; (lihat code baris ke-18)
    • Grant Privileges user ke database dengan mengetikkan command:

      GRANT ALL PRIVILEGES ON wordpressdb.* to wordpress@localhost; (lihat code baris ke-21)
    Jika sudah selesai, ketik exit dan tekan enter (code baris ke-24).


    root@linggih:/var# mysql -u root -p
    Enter password:
    Welcome to the MySQL monitor.  Commands end with ; or \g.
    Your MySQL connection id is 38
    Server version: 5.5.22-0ubuntu1 (Ubuntu)
    
    Copyright (c) 2000, 2011, Oracle and/or its affiliates. All rights reserved.
    
    Oracle is a registered trademark of Oracle Corporation and/or its
    affiliates. Other names may be trademarks of their respective
    owners.
    
    Type 'help;' or '\h' for help. Type '\c' to clear the current input statement.
    
    mysql> CREATE DATABASE wordpressdb;
    Query OK, 1 row affected (0.00 sec)
    
    mysql> CREATE USER 'wordpress'@'localhost' IDENTIFIED BY 'wordpresspass';
    Query OK, 0 rows affected (0.00 sec)
    
    mysql> GRANT ALL PRIVILEGES ON wordpressdb.* to wordpress@localhost;
    Query OK, 0 rows affected (0.01 sec)
    
    mysql> exit
    Bye
    root@linggih:/var#

  9. Hampir Selesai. Sekarang mulai setup Wordpress. Buka alamat IP seperti yang sudah dijelaskan di atas pada halaman web browser. Ketikkan ifconfig -a pada jendela bash untuk identifikasi alamat ip. Pada tutorial ini tidak akan menggunakan alamat IP, namun akan menggunakan hostname (linggih.httpserve.com). Karena Script WordPress belum disetup, maka akan keluar halaman Error seperti pada gambar Screenshot 27. Klik pada tombol Create a Configuration File untuk mulai setup wordpress.
  10. Selanjutnya anda akan diminta menyediakan persyaratan-persyaratan sebelum melanjutkan proses setup (Database name, Database username, Database password, Database host). Semua persyaratan sudah dibuat pada poin sebelumnya, klik tombol Let's go! untuk melanjutkan (Screenshot 28).
  11. Detail database connection, isikan dengan detail database yang sudah dibuat pada poin sebelumnya. Pada tutorial ini, detail database connection yang dipakai:
    • Database Name: wordpressdb
    • Username: wordpress
    • Password: wordpresspass
    • Database Host: localhost
    • Table Prefix biarkan dengan value default wp_.
    Klik tombol Submit untuk melanjutkan (Screenshot 29).
    Install_Ubuntu_server34

    Screenshot 27

    Install_Ubuntu_server35

    Screenshot 28

    Install_Ubuntu_server36

    Screenshot 29

  12. Jika infomasi detail database cocok & WordPress dapat terhubung dengan MySQL, maka akan keluar tampilan seperti gambar di bawah (Screenshot 30). Klik tombol Run the install untuk mulai proses install Script WordPress
  13. Pada halaman selanjutnya, tentukan informasi situs yang ingin anda gunakan (Site Title, Username Admin, Password dan E-mail). Setelah selesai tekan tombol Install WordPress (Screenshot 31).
  14. Selesai. Situs WordPress anda berhasil di setup, klik tombol Log In untuk masuk pada halaman admin panel (Screenshot 39).
    Install_Ubuntu_server37

    Screenshot 30

    Install_Ubuntu_server38

    Screenshot 31

    Install_Ubuntu_server39

    Screenshot 32

    Install_Ubuntu_server40

    Screenshot 33

    Install_Ubuntu_server41

    Screenshot 34


Setting Remote Server

OpenSSH memberikan kemudahan akses bagi anda untuk login ke server tanpa harus via bash Ubuntu Server. Jika anda memakai OS Windows, anda perlu software SSH client untuk remote server. Kebanyakan orang menggunakan Putty, download Putty di sini.

Setelah terinstall, buka program Putty. Host Name (or IP address) isikan dengan alamat ip atau hostnamenya, Port isikan dengan port SSH (Default Port 22). Isikan Saved Sessions dengan nama terserah & klik tombol Save untuk simpan sesi login server atau klik tombol Open untuk login ke server tanpa simpan sesi login server (Screenshot 35).

Anda akan mendapat pesan peringatan (Putty Security Alert) ketika sukses login server (Screenshot 36). Tekan tombol Yes, setelah login anda dapat mengetikkan command seperti layaknya mengetikkan command pada jendela bash Ubuntu Server. Setelah selesai, ketik exit dan tekan Enter (Screenshot 37).
Install_Ubuntu_server42

Screenshot 35

Install_Ubuntu_server43

Screenshot 36

Install_Ubuntu_server44

Screenshot 37


Trik Membuat Home Dedicated Server Dapat Diakses Via Internet

Persyaratan utama yang harus dipenuhi untuk trik ini adalah menggunakan DMZ atau Port Forwarding, dengan kata lain koneksi internet di rumah anda harus dimanage via router. Karena DMZ atau port forwarding hanya bisa dimanipulasi oleh router.

Jika router tersedia, selanjutnya setting domain anda pada http://dyn.com/ atau http://www.no-ip.com/. Setting port forwarding tidak akan dijelaskan pada artikel kali ini, akan saya coba tuliskan di lain waktu.

Selesai.

Anda sekarang tahu mengenai fungsi dan cara setup basic web server. Artikel ini hanya untuk tujuan testing semata, dan mungkin bisa dijadikan alternatif web server jika traffic situs tidak terlalu besar dan komputer anda selalu online. Namun jika situs anda merupakan situs bisnis & mempunyai banyak client, jangan menggunakan alternatif ini. Karena mengapa??? Tentu saja anda tidak akan mau server menggunakan satu sumber tenaga (power source) dengan mesin cuci, hairdryer, kulkas, mesin pemanas atau komponen boros energi lainnya. Kalau listrik tidak sanggup handle, down servermu... hehe... :D.

Disarankan anda sewa dedicated server pada provider khusus server, karena mereka punya sumber tenaga yang baik dan selalu termonitor 24/7.

Penulis berharap artikel ini dapat memberikan pemahaman bagi anda yang masih awam mengenai server, bagi para master.. terima kasih sudah mampir serta diharapkan saran & masukannya.

Semoga bermanfaat.
:)
Loncat ke Atas ↑